


Breadhead SO the last time i checked in I was concerned about the starter that decided to trick me by stalling. But because of your council, I stayed the course and (of course, just as you said) it began show signs of life after a couple of days. Now I'm at the point of figuring out if this creature floats or not. As I read in this thread, you do the float test and if the teaspoon or tablespoon size of starter in a small container of water actually floats, its ready for prime time baking. Well, this guy floats for a little while then heads for the bottom of the glass. My question: Does the small quantity of starter float "indefinitely" to pass the test or just for a few seconds?
-
-
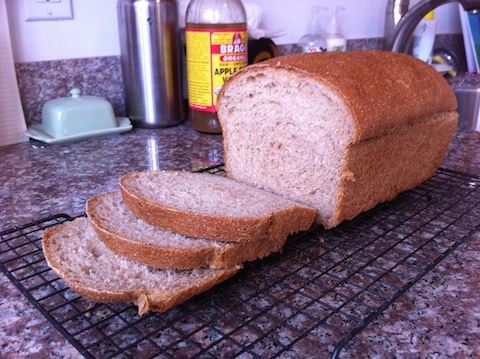
So here is the first boule made with Chef Jacob's recipe. I'm afraid it did not turn out as well as I would have liked. Bad things: not enough oven spring. Crumb more dense than desirable. Good things: tastes great! I like the bit of whole wheat in there. Nice crispy crust.
I followed Chef Jacob's recipe exactly. I REALLY had to resist the temptation to add more flour. The dough passed the windowpane test, but was still a bit stickier than I am used to. I need to work on my tension pulls a lot. Overall, it isn't terrible. I believe it is what you would call "toast bread".Comment
-
The good thing about sourdough bread is even your less than perfect loaves taste great.👍 Your picture didn't post successfully, please try again. It helps to see it to try to figure out what happened.Originally posted by jgjeske1 View Post
For your next loaf try this recipe and follow Chef Jacob's processes & techniques exactly.
500 grams bread flour
200 grams sourdough starter
300 grams water
12 grams salt
Chef Jacob's recipe is 70% hydration dough. This recipe is a 66.6% hydration dough. That little difference makes it much easier to handle. After a few loaves and after you've learned the techniques to develop your dough properly you can increase the hydration of your dough again.
"I need to work on my tension pulls a lot."
Final shaping and especially those tension pulls are critical for getting maximum oven spring. It can take as many as 3 tension pull sessions to achive MAXIMUM tension. Personally I try to get as much tension on the outer smooth surface of the dough ball to the point I'm worried about tearing the skin.🤔
Also... When you put your dough ball into your banneton, smooth side down, make sure you pinch together the little holes that may appear on the bottom of the dough that is now facing up, before you sprinkle it with flour. That will keep the gasses from escaping during the final proofing process.
Did you use the Dutch Oven for getting steam or did you use the stainless steel bowl method? The DO method is fail proof if you set the lid so no steam can escape.
If you get lots of tension during final shaping, your dough passes the poke test and it gets lots of steam during the first part of the baking process... You should achive maximum oven spring.👍👍👍
Good luck on your next loaf. Happy baking.👍Last edited by Breadhead; August 28, 2016, 06:13 AM.Comment
-
Weird. I can see my pictures just fine. Dang buggy software. I seem to recall that you mentioned the 66.6% dough to someone else a while back. I should have tried that first. That was not my first sourdough, but it was my first using Stella Culinary methods. I like the slap and fold method, although I made a bit of a mess at first.
The dough definitely passed the poke test. I do not have a Dutch Oven yet, so I used the stainless steel bowl. Although I'm not sure if I did it correctly. I put several ice cubes on my baking stone before covering with the bowl.Comment
-
66.6% VS 70% dough is just easier to work with, easier to learn with. After you've learned Chef Jacob's techniques it's easy to increase the hydration level to 70%.Originally posted by jgjeske1 View Post
Slap and folds...👌 It's the greatest innovation in kneading bread dough to come along in a 1000 years.👌 I keep a small bowl of water on my work bench to dip my fingers in during the process. Dough will not stick to wet hands.
Getting water on your dough to create steam under the SS bowl... Make sure you preheat the SS bowl along with your baking stone. Then when you are final prepping your dough to put it on the stone, try this.
Score the dough with your lame and then spray a generous amount of water on the dough using a misting squeeze bottle. Using a silicone glove, remove your SS bowl, transfer your dough on to your baking stone and place the bowl over the top of your dough. I leave my SS bowl on for 20 minutes while my bread is baking at 500° and then I remove the bowl and turn the baking temperature down to 450° to brown the crust. You will probably need to rotate the dough 180° after 5 minutes to get even browning.
Good luck on your next loaf.👍Last edited by Breadhead; August 28, 2016, 09:55 AM.Comment
-
Using the Dutch Oven VS the Stainless Steel mixing bowl method for creating steam on your sourdough bread during the baking process.
The Dutch Oven method is a No Brainer and I think that is why Chef Jacob chose that method for his basic sourdough loaf. It's easier for a first time bread baker to achive success. Be sure to set your lid so none of the steams escapes during the first 20 minutes. Some DO's have a small dip in the top rim but the lid has a lip that covers it. That gives the cook a choice of allowing steam to escape during the cooking process or to block it. You definitely want to block it. However... Using the DO method restricts how you can score your dough with your lame and it's NOT easy to transfer from your banneton into the DO.
The Stainless Steel mixing bowl technique... Is my preferred method because it is much easier to transfer my dough from my work bench to my baking stone using a bread/pizza peel. Plus I can score the dough with ANY pattern I choose, more creativity.👌 I'm not restricted by the shape and height of the hot, hot DO. If you choose this method make sure to preheat the SS bowl along with your oven & baking stone. I use a knife to raise the SS bowl slightly so I can lift it with a silicone mitt to move it aside while I mount the dough on the stone.
If you don't already have a DO... You don't need to buy one for baking sourdough bread. SS mixing bowls are much less expensive.👍
This picture shows the tools I use to prep my dough after removing from the banneton onto the silicone baking mat that I place on top of the pizza peel to transfer it to the preheat pizza stone, under the SS mixing bowl.- Misting bottle to spray water onto the dough after scoring it with the lame.
- IFR thermometer to check the temp of my pizza stone.
- Lame... The yellow razor blade looking thingy.
- Blue silicone mitt to lift the hot SS mixing bowl.
- Silicone baking sheet to transfer the dough off of the pizza peel onto the preheated pizza stone. Also used to rotate the loaf during the browning process to get evening browning.
- Wooden handle bench scraper... To lift the hot, hot mixing bowl so I can grab it with the silicone mitt.
- Red cup of water... To dip my lame in before scoring the dough. Dough does not stick to wet objects.
- Thermapen... To make sure my loaf is at least 203° before removing it from the oven.
- Silicone brush to remove the rice flour from the top of the dough before scoring it.
- Pizza peel to transfer dough and finished loaf onto and off of the pizza stone.
Attached FilesLast edited by Breadhead; August 28, 2016, 08:42 AM.Comment
-
Ray ... Making Whole Wheat bread requires more than just a different hydration rate. Here is a link to a very good eduction for making WW bread. I recommend you read this information so you understand the how and why of it all.
Comment
-
Breadhead...My first sourdough loaf...so here's my 1st dive-in with both feet shot at a sourdough boule, inspired by this post. Starter launched back in mid-July, spent some time in cold storage for lack of time to create/bake. Followed Your 66% hydration proportions and Chef Burton's direction via Stella Culinary bread videos.
What went right:
Starter Dave passed the float test
stretch & fold and tension pulls
shaping the boule
Crust
flavor
What went not so right:
didn't mix starter & water together before adding to flour
over-mixed dough at the shaggy mass stage
didn't get the full 12g of salt in the mix
dough felt dense from the start and never really seemed light and airy after resting
dough bounced off the work surface (quartz counter-top) at the slap & stretch stage
Dense cavernous loaf
Thank You Breadhead for getting me this far. Couldn't have even come close to creating this loaf without your expertise. I would truly value your honest critique and suggestions for improvement...beyond paying attention to the details!!!
Overall a great experience and I now truly understand the wisdom behind the advice that it's all technique, technique technique...I'll be workinonit!!!
Dough boy Dave (no offense to our brothers in GB!!) after 1/2 hour at 500 degrees in covered DO
Finished Loaf
Crumb
Comment
-
CarlP3 ... Ok, your very first loaf wasn't perfect but it was very close. I think with a few slight adjustments you will reach perfection.
What went right:
Starter Dave passed the float test
stretch & fold and tension pulls
shaping the boule
Crust
flavor
What went not so right:
didn't mix starter & water together before adding to flour
over-mixed dough at the shaggy mass stage
didn't get the full 12g of salt in the mix
dough felt dense from the start and never really seemed light and airy after resting
dough bounced off the work surface (quartz counter-top) at the slap & stretch stage
Dense cavernous loaf
What went right:- The one critical step I don't see on that list is the poke test. That's the saftey check to make sure you dough is not under or over proofed. That may in fact be the remedy to the large holes in your crumb.
- Bulk fermentation step. Your dough should only be allowed to rise 1 1/2 times its original mass, not double its mass.
- Did your dough pass the window pane test at the end of your slap and folds? This is a check on gluten structure/development.
- Final shaping and tension pulls. A critical step for maximizing oven spring. Make sure your final shaped dough will stay tight while bench resting on your work bench for a couple of minutes after the last tension pull. If it collapses your gluten development is not adequate.
What went not so right:- Not mixing the starter with the water before adding the flour. It's best to do that but will not cause a catastrophic problem.
- over mixed dough at the shaggy mass stage. Again, best to do as you see on the video but not catastrophic.
- Salt... 1% to 2% of the weight of the flour is fine. Not to worry.
- Dough tight and dense... It won't feel light and airy until after the bulk fermentation step. It should feel puffier during the stretch and fold steps.
- Dough bounced off the counter top during the slap & folds. It takes time for the gluten to tighten up the dough. It should start to tighten up in 3 to 5 minutes of starting the S&F's.
- Dense cavernous crumb. Watch the video again paying close attention to the window pane test, final shaping and then watch the video on the poke test again.

Comment
-
If my last 2 loaves were collapsed, I don't think I correctly final shaped and tension pulls. If it's not tight in the bench after bulk fermentation and final shaping, what should I do? Keep stretch/folding and shaping? BreadheadLast edited by scottranda; October 28, 2016, 04:48 PM.
-
Thanks Breadhead...I will print this post and keep it nearby as a reminder when I do the next loaf. It was around 1 a.m. and I was tired when I posted the above so I forgot to include the poke & window pane tests in the what went right side. I did do both but not wasn't exactly sure if what I was seeing was correct. I'll replay Stella Culinary videos a couple of more times before then also. Thanks again for all your help!!!Comment
-
CarlP3 ...
It was either under proofed or over proofed; hard to tell from that picture and without knowing what the environment and timing was like.
The big holes are called "Mouse Holes." They're caused by not completely degassing the dough before forming. This leaves a couple large gas pockets that over-expand during proofing and oven spring.
If I had to guess looking at the picture, I would almost say that the loaf was under-proofed.
The degassing should happen during the stretch & fold process after the bulk fermentation process.
Comment
-
Breadhead ...Thinking back on my technique, especially at the stretch & fold, I think your assessment is on target. I handled the dough rather gently during the s & f because that's what I thought I remembered Chef Burton doing in his video. On replay I can see that after the stretch he is actually pressing the dough together (degassing?) with more force than I had originally thought. I didn't realize that degassing was part of the s&f process (strike 1.) The first proof was three hours in a covered bowl on the counter-top however, we like to keep the house rather cool at 72 so that probably wasn't the optimal environment (strike 2.) After forming, the loaf was placed in a covered banneton and rested inside a closed pilot-less oven for 2 hours...because I was guessing about the cool room temperature. Under proofed and under degassed...0 and 2 bottom of the first. Next pitch...lookin' for a base hit!!!Comment
-
For every 15° variations in ambient temperature the process doubles or is cut in half.
If bulk fermentation takes 2 hours at 72°, it will take 1 hour at 87° and 4 hours at 57°.
File this equation in your mind. If you go to a different climate and want to bake a loaf for friends in their kitchen knowing this will allow you to adjust your proofing & fermentation times.👍Last edited by Breadhead; August 29, 2016, 10:55 PM. -
Hmmm... Knowing more about the environment of your bulk fermentation and final proofing, I'm now leaning toward over proofing or a combination of not degassing and a warmer final proofing for 2 hours.
I would suggest you do the whole process on your next loaf at the 72° ambient temperature. Start preheating your oven 30 minutes after putting your dough in the banneton too.Last edited by Breadhead; August 29, 2016, 11:05 PM.
-
-
MBMorgan ... I just reread one of your posts and thought I should comment on something I failed to comment on earlier.
"3. Salt - incorporated during slap and fold (too messy, I'll do this differently next time) - done"
This is the CORRECT time to add the salt. Salt is a gluten strand inhibitor. We're giving the gluten development a head start by not adding salt up until this step.
Try this... Before taking your dough out of the autolyse vessel sprinkle part of the salt over the surface. Fold it over itself and sprinkle more salt on it. Fold it once more and add the remainder of the salt. Take the dough out of the vessel and start the slap and fold process.👍
I find that method works best for me. The salt will get redistributed evenly, during the S&F process.Last edited by Breadhead; August 29, 2016, 11:35 PM.Comment
-
"I guess somewhere along the way I picked up that warmer temps were best for proofing...old tapes."
CarlP3 ... If my ambient temperature was 50° and I wanted to make a same day loaf of sourdough bread I would do a few things to speed up the process. I would use 85 to 95° water to mix my dough. I would use your pilot-less oven proofing method and try to keep the dough at about 80° through out the process.
That would not be a great loaf of bread but it would speed things up dramatically.
After you hone your techniques on the entire process I'm going to encourage you to dramatically slow the entire process down. Which will give you a much better finished product.👍
Slower delayed fermentation bread is Artisan bread that highly skilled bread bakers become famous for. You can't buy that bread anywhere.
All it takes is knowledge. It takes exactly the same amount of hands on labor as a same day loaf, and lots of waiting. I call that my low and slow loaf.😎 Very little sourdough starter and lots of waiting.👍
Really great sourdough bread is just like a brisket. It takes time, lots of time, and it's done when it's done, about 2 days.👌Last edited by Breadhead; August 30, 2016, 12:15 AM.Comment


Comment