Welcome!


This is a membership forum. Guests can view 5 pages for free. To participate, please join.

[ Pitmaster Club Information | Join Now | Login | Contact Us ]

Only 4 free page views remaining.

Announcement

Collapse
No announcement yet.

Anyone have a rotisserie for the WSCG? I'm going to try this

Collapse
X
 
  • Filter
  • Time
  • Show
Clear All
new posts

    #16
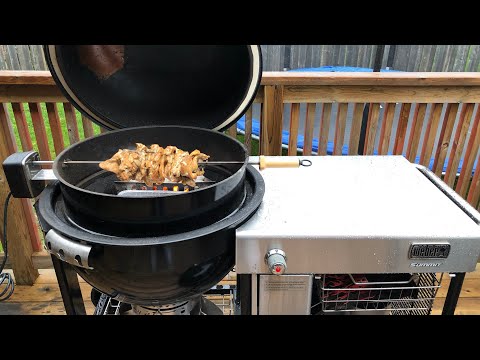
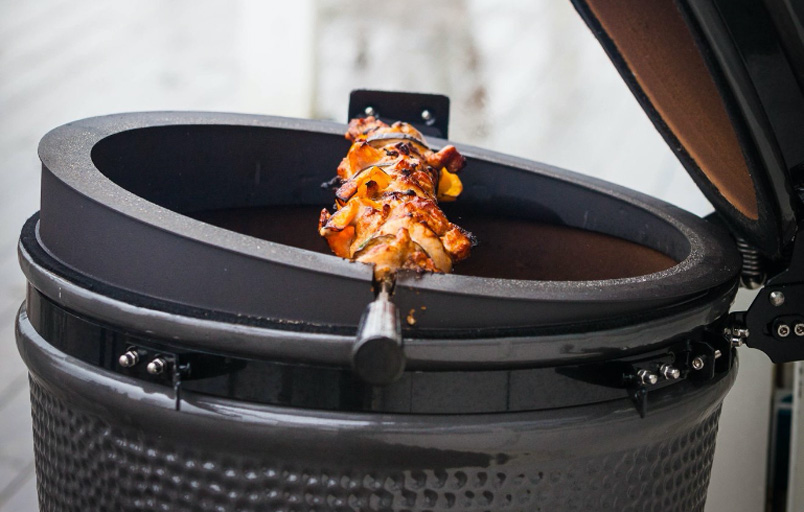
    Well, I modified mine with a Dremel (rotary) tool using a few of their metal cutting disks. I could have done a better job with keeping straight lines along the inner lip. however, this has *zero* effect on fit (the outer lip sits perfectly flush now) and I was able to use the same cutting disks to create nice smooth edges (no worries about sharp edges cutting skin or scratching the grill's paint). I skipped the sanding and applied on high temp paint direct from the spray can using painter's tape to reduce overspray (could have done better with that, hehe, but good enough for government work). It took maybe 1-2 hours of actual active time and maybe 20 dollars worth of materials (a few metal cutting disks plus high temp paint from Home Depot). This was not difficult.

    I'm quite happy with the result. Though it does not look like a proper factory job if one looks carefully (you'd have to look at the inside of the rotisserie ring to notice), it was easy, reasonably safe, works well, and looks like a normal factory setup from the outside. I'd recommend this approach if you have a modicum of mechanical skills given the lack of other options out there today.
    Attached Files
    Last edited by plaak; April 7, 2021, 04:53 PM.

    Comment


      #17
      I did see that someone took their Rotisserie ring and 22 Kettle top and used that IN the WSC. The ring fits inside, and the kettle top fits on with the WSC top open. Might try it myself for laughs.

      Comment


        #18
        I found a couple of You Tube videos showing the use of the Weber Rotisserie for the 22.5" kettle in the WSCG/WSCGC, just as you suggested, The Marshal . Looks like a winner to me. Thanks for the suggestion.


        Kathryn
        Last edited by fzxdoc; April 17, 2021, 03:23 PM.

        Comment


          #19
          I considered that. I prefer the cleaner look and not having to keep a 22" lid handy (I have a 22" kettle at home but moved it to my shed once I got my WSCG working). I'm very happy with the end result and it wasn't hard to modify IMO. However, if you don't feel like cutting the Joetisserie ring a bit that's probably a good option from a functional point of view. I suppose it's a bit cheaper too!

          Comment


            #20
            plaak , your mod is awesome, no doubt. But I already own the ring and a top.... so cheepy me will be happy

            Comment


              #21
              Yes, by all means, that makes sense!

              BTW-I basically copied the path blazed by glitchy, albeit with some different, somewhat more basic tools (dremel rotary tool vs angle grinder). I just wanted to chime in for the benefit of others that this is a lot easier than it may seem. I, at least, envisioned a substantially more demanding task before I got my hands on the Joetisserie. Because the inner lip to be modified isn't doing much of anything (as in, it's not even supposed to touch the kamodo to create a seal) you don't need to make a particularly straight or accurate cut. Just remove enough material near the back of the Joetisserie that the inner lip doesn't hit the WSCG fire bowl (the Big Joe grills are presumably at least a smidge deeper there) then smooth it up decently for safety and aesthetics.

              I snapped some amateurish pictures with my smartphone that might help others better understand the task if I annotate them decently.... perhaps later.


              Comment


              • fzxdoc
                fzxdoc commented
                Editing a comment
                I'm looking forward to seeing those detailed photos. You did a great job, and now have a rotisserie that perfectly fits your WSCGC. It's always somewhat daunting to start whittling away at a pricey piece of equipment, so kudos to you for persevering with that Joetisserie ring mod and achieving your goal..

                Kathryn

              #22
              This has been educational!

              Comment


                #23
                Excellent post as usual!

                Comment


                  #24
                  Some quick and dirty (read: badly) annotated pictures to help those potentially interested in doing this better understand what is required. It's much easier when you can see the Joetisserie in person. Hopefully, this helps more than hurts.

                  In short, the depth between the surface the WSCG lid rests on (the top of the bottom bowl) and the surface on which the WSCG grate rests is approximately 1.25 inches deep whereas the "inner lip" (as I've taken to calling it for want of a better term) of the Joetisserie ring projects down approximately 1.75 inches at the rings rear-most point on the plane from which the ring hangs. This "inner lip" material is approximately constant in length but, because of the wedge-like shape on the outer part of the ring, it projects down much more at the rear than at the front, the WSCG lacks sufficient depth at the rear for the ring to sit flush.

                  At the rear-most part of the ring, you need to cut approximately 1/2 an inch of metal. This amount decreases as you move towards the front (only the back ~1/3 of the ring is affected). If you measure the WSCG's depth you can use that to mark a line along the ring's "inner lip" from the plane on which it's supposed to hang corresponding to this depth indication (I used a permanent marker), then use that line to cut material away. You're probably better erring on the side of cutting too much as opposed to too little so that you don't need to cut more material away later.

                  Again, this really isn't hard. You don't need to be particularly accurate (straight) with your cuts. You just need to ensure you remove enough material that the outer part of the ring can sit flush, then smooth it out enough to remove potentially abrasive or sharp edges. I did an adequate job with a basic Dremel rotary tool and a few of their metal cutting blades (about 10 bucks worth at Home Depot). Even though I took my time to ensure I didn't hurt myself and did it in segments, I accomplished this task in 1-2 hours (actual cutting probably 20-30 minutes). My cut wasn't perfectly straight but it really doesn't matter since this isn't this surface isn't supposed to touch anything. The ring sits on the outer lip and that creates an adequate seal even without a gasket for the purposes of rotisserie. It's relatively easy because you don't need to worry about this surface from a functional point of view (aesthetically you're not going to see it unless you look closely at the inside of the ring)

                  It's probably more important to smooth over sharp or abrasive edges when you're done with your cut(s) (I just used my Dremel cutting blade to smooth it over after I made my cuts) and then preferably also apply some high temp paint to the cut or otherwise scuffed up surfaces (this helps aesthetically and with potential rust in the long run, obviously). It's quite straightforward when you can see it with your own eyes IMO, but it's nice to know what you're getting into before you buy it.

                  Incidentally, I picked mine up for $184 on Amazon warehouse (used, tho in perfectly good condition). I guess the price fluctuates a fair amount for whatever reason as the new units are listed for $253 now, $220 for lowest price used at the moment. You may have better luck later.
                  Attached Files
                  Last edited by plaak; April 19, 2021, 06:58 AM.

                  Comment


                    #25
                    Thanks for the additional details and the photos, plaak . This topic is a keeper for sure.

                    Kathryn

                    Comment


                      #26
                      I just did this with a Joetisserie I received as a Christmas present. It felt kind of weird to immediately be hacking into something somebody gave you, but I had asked for it with the knowledge I'd be doing this to it and it was a lot cheaper than the spit on fire one. Overall, not a difficult job but it would sure have been nice to have a proper cutting tool instead of my Dremel, which kept getting hot and needing a cool down.

                      Also, if you do this wear proper eye protection, not just a pair of glasses. Aluminum shavings will go everywhere. Also, to reduce your cutting time if using a Dremel, you can cut deep, but not all the way through with your Dremel and then cut perpendicular with a hack saw, then break the weakened part off.

                      I wish I could say my end product looked as professional as glitchy 's but I think it'll work for sure. My next step is to put some smoker gasket around the part of the ring that sits inside the Summit to keep it from wobbling around in the bowl. Not necessary, but that way it'll fit a bit more like a glove.

                      Comment


                        #27
                        GoDuke Photos?

                        Kathryn

                        Comment


                        • GoDuke
                          GoDuke commented
                          Editing a comment
                          I’m a little embarrassed with the final product, especially compared to glitchy but I’ll try and snap a few to post for others benefit. I finished just before kids naps ended so no time for photos

                        #28
                        I purchased Kamado Big Joetisserie for my S6 Weber Summit Kamado Grill. The modifications looked fairly simple thanks to the information posted here from other members glitchy, @Plaak.I had hoped Weber would have designed their own Summit Rotisserie by now, but since they have not I went ahead and modified my Joetisserie. Since I needed to touch up the paint, I figured I​ might as well ditch the Joetisserie logo. Came out decent , now I need to fire it up and put this rotisserie to good use. I may need get some Nomex gasket material, we will see how bad it leaks this weekend.

                        Click image for larger version  Name:	PXL_20220130_022224744.jpg Views:	0 Size:	3.04 MB ID:	1179893​

                        Click image for larger version  Name:	PXL_20220205_224619172.jpg Views:	0 Size:	3.39 MB ID:	1179892​​
                        Click image for larger version  Name:	PXL_20220224_180950928.jpg Views:	0 Size:	3.25 MB ID:	1179894​
                        Click image for larger version  Name:	PXL_20220224_185636925.MP.jpg Views:	0 Size:	3.09 MB ID:	1179895


                        ​
                        Last edited by Smoked Transistors; February 24, 2022, 07:05 PM.

                        Comment


                          #29
                          Thanks for the writeup and photos, Smoked Transistors . Let us know how that first roto-cook goes.

                          Kathryn

                          Comment


                            #30
                            Does anyone have any knowledge about The Spit On Fire? I saw it on a Facebook page and apparently it is compatible with the Weber Summit Kamado and other grills (Big Green Egg, Kamado Joe, Primo). The website is in another language (Dutch?).

                            The Spit on Fire is een rotisserie met een RVS draai spit en elektrische motor. Het spit past perfect op verschillende kamado merken en maten.

                            Comment


                            • glitchy
                              glitchy commented
                              Editing a comment
                              Yes, I believe they are Dutch. There’s a way to order by contacting them and paying international shipping. That’s why I went the route I did instead.

                            • HawkerXP
                              HawkerXP commented
                              Editing a comment
                              If you mess around with the British flag on top of their home page, I got it to translate to English.

                            • kenrobin
                              kenrobin commented
                              Editing a comment
                              HawkerXP Thanks, I couldn't get the British flag to work in Google Chrome but it worked for me in Firefox.

                          Announcement

                          Collapse
                          No announcement yet.
                          Working...
                          X
                          false
                          0
                          Guest
                          Guest
                          500
                          ["pitmaster-my-membership","login","join-pitmaster","lostpw","reset-password","special-offers","help","nojs","meat-ups","gifts","authaau-alpha","ebooklogin-start","alpha","start"]
                          false
                          false
                          {"count":0,"link":"/forum/announcements/","debug":""}
                          Yes
                          ["\/forum\/free-deep-dive-guide-ebook-downloads","\/forum\/free-deep-dive-guide-ebook-downloads\/1157845-paid-members-download-your-6-deep-dive-guide-ebooks-for-free-here","\/forum\/the-pitcast","\/forum\/national-barbecue-news-magazine","\/forum\/national-barbecue-news-magazine\/national-barbecue-news-magazine-aa","\/forum\/national-barbecue-news-magazine\/national-barbecue-news-magazine-aa\/bbq-news-magazine-2019-issues","\/forum\/national-barbecue-news-magazine\/national-barbecue-news-magazine-aa\/bbq-news-magazine-2020-issues","\/forum\/national-barbecue-news-magazine\/national-barbecue-news-magazine-aa\/bbq-news-magazine-2021-issues","\/forum\/national-barbecue-news-magazine\/national-barbecue-news-magazine-aa\/bbq-news-magazine-2022-issues","\/forum\/national-barbecue-news-magazine\/national-barbecue-news-magazine-aa\/current-2023-issues","\/forum\/national-barbecue-news-magazine\/national-barbecue-news-magazine-aa\/current-2024-issues","\/forum\/free-deep-dive-guide-ebook-downloads\/1165909-trial-members-download-your-free-deep-dive-guide-ebook-here"]
                          /forum/free-deep-dive-guide-ebook-downloads/1165909-trial-members-download-your-free-deep-dive-guide-ebook-here