


I just set up my new KBQ C-60 for tomorrow's first cook. The instant read thermometer that came with it won't fit into the controller hole. I could drill the hole out larger, but I prefer just buying one that fits. I know that some Thermoworks units fit, but I can’t source them locally. So...Which ones that are readily available from big box stores fit? Maybe I can quickly locate one.
-
-
That doesn't sound right, the one Bill sent should fit. I'll see if I can locate a pic as mine is a bit hard to get to now.-
Here's one, post #17 and #29 https://pitmaster.amazingribs.com/fo...radition/page2Last edited by ComfortablyNumb; November 8, 2019, 07:07 PM. -
ComfortablyNumb, the thermometer in those two posts look like the one that came with the KBQ but doesn't fit. I'll try again. If it doesn't fit, I'll mike the hole and shaft. -
pmillen If it does not fit contact Bill Karau, he's the tops when it comes to customer service.
-
-
This is the one I use for my KBQ.
However, I am not sure you’ll be able to locally source this one. I know Williams Sanoma carries them. Honestly, you are better off running a leave in thermometer into the cooking chamber. That is what I do most of the time.
Here is a good leave-in option.
Comment
-
pmillen Cables are best routed through the top corner of the door, not sure how you would get them through the louvers. A pic can be seen at https://pitmaster.amazingribs.com/fo...ous-hogs/page2 post 17 -
ComfortablyNumb, the seal where the cable exits the probe won't pass through the openings in the top front corners and the door corners didn't seem to work for me. There's some metal there that looks like a wire cutter. There's room for the cables where the firebox fits into the main body. They can be fed into the chamber through the top louver.
-
-
The larger diameter portion of the probe won't pass through the first hole so the narrower portion doesn't reach the access hole.Comment
-
pmillen Which thermometer did you receive with you cooker?
I got the one mentioned by
Spinaker
Here is a photo of how and where it goes. It does not go in all the way, just sits like shown in this photo. It actually sticks out.
My personal experience with this specific thermometer was not really the best. It’s accurate for sure, but the heat... radiating from the unit, eventually affected the LCD display. After several minutes, it went blank and essentially unable to take a reading,
It did return to normal after cooling off. I would recommend not letting it sit there while you cook. Just place it, give it a minute or 2, then remove it. Otherwise, it could melt the display for good and that’s the end it it.
After this experience, I went with a DOT from thermaworks. Not really the best there either.
What really worked for me in the end was the FireBoard. You will need to snake the probes through the box. I’ll try to locate a photo of how I did it. No drilling nor any type of changes the the unit are required.
To be honest... I resisted the initial advise to just not worry about having a temperature probe for the KBQ cooking chamber. In the end, that truly was not necessary. What I recommend is probing your meat. That way you will know when it’s done, you don’t need to probe it every 2 minutes nor anything so frequent like that, so with practice you will be able to get a good handle on how to tell when your bbq items are close to being done and when it’s the right time to probe. Look for color and check regularly, but rest assured you don’t need minute by minute readings.
The Thermapen MK4 is the way to go. It’s the most reliable I’ve been able to use and highly recommend it.
Just open the box, probe your meat, give it one second and that’s it.
If you want to see the internal temp of the chamber, and more importantly, that of your items, without opening the box, go with the FireBoard. You won’t go wrong with that either. I’ll try to see if I have pictures of the FireBoard install, no modifications nor perforations needed. The FireBoard will give you minute by minute readings of as many items, plus cooking chamber. There is a limit, but that’s on the FireBoard per se.
On another note, I see you are getting ready for a first cook. I struggled a bit with this. The manuals and information out there are not really the best. Yes, they are simple, and in the end it’s really simple. So go for it. You will learn a lot after going through the motions yourself.
Here is what I would suggest, from my limited experience and recalling my initial cooks.
1. Keep the fire box full. Don’t let the holes at the bottom of the fire box be seen. If you see them, you don’t have enough wood in the box. Ok if you see one or 2, here and there, but if you see most, then you don’t have enough fuel and the temperatures will not remain steady. In fact, you may have to start all over because not enough lit coals will essentially burn itself out.
2. Don’t mess with the fire when your fan is â€drawing in†or suctioning heat and smoke into the chamber. How will you know it’s doing that? Well, you will hear and see 2 conditions. One where there is no smoke around the unit and audible fans (2) are running... this is the time to let it be. Don’t mess with it.
When one of the fans, specifically the draw or intake fan stops, you will see more smoke coming out of the firebox just going up and away. Thats the time to poke at the coals. Why? If you poke at it when it’s inhaling, you will introduce ashes, and more of the so called dirty smoke into the cooking chamber, and that will of course affect your food. So only poke at it when it’s not inhaling. The â€on/off†cycles are dependent on the temperature setting of the dial that you set, and the amount of available heat-lit coals. If you don’t have enough, it’s going to inhale for a long long time, you don’t want that. You want on off cycles that stay even or that are well... cyclical.
3. Poppet settings are critical too. They don’t stay. It’s easy for them to move without noticing that took place. Keep and eye on that, and either continually adjust and reposition when they move on you. They will, it’s not if they move, but when they move on you. Why? Well, one lets cleaner smoke in, the other more dirty smoke in. If you like it smoky, but not too much, go with the top poppet closed. Lower open. If you don’t know what you like, start with this. Top, closed, bottom open. Keep checking every time you put the lid back on. We are dealing with very hot metal components, they move.
4. Handling the lid is very tricky. That lid design is not really the best and in my opinion, needs work. Get yourself some nice gloves to protect hands and forearms, don’t touch it, and take your time removing and placing the lid back on. You can use the poker stick that comes with the unit, or get a nice metal rod to help handle it, It’s ok to let the lid sit a bit open, particularly when you have a piece of wood pending to burn, but keep in mind that the lid is super hot and it’s dangerous. No flip-flops, shorts or pets around the cooking area. If the lid falls, let it. Just handle with care. Keep your distance and be on guard when feeding the unit.
5. I would highly recommend using an aluminum food tray at the very bottom of your cooking chamber. It can hold water if you want to use a water pan, it makes cleanup easier too. I did not use it the first times and the clean up was just more work, unnecessary work. The pan catches a lot of stuff. Use a pan.
If you have the wood cut to size, ready to go, and have your cooker running, just feed it and check internal temp of meats with a probe. Don’t worry too much about cooking chamber temperature, yes...it’s important, but not nearly as it is to check internal temp of meats, and tending to the fire.
Don’t overcrowd chamber on your initial cooks, try to stick to 1 item or 2 items the first time. Cooking 60 pounds of meats because you can is not the best way to start. I’ve done 3 large briskets at one time, they turn out great, but you need to start small, get to know the unit, get to learn what it’s telling you.
The unit makes some humming noises, you will know when it’s purring and happy, as well as when something is off.
It takes a bit of practice, not a steep learning curve, but there is one nevertheless.
Hope this helps.
Cheers,
RicardoLast edited by Ricardo; November 9, 2019, 01:10 PM.Comment
-
A few responses to the excellent post by Ricardo
That is indeed how the thermometer sits. I have used during entire cooks and have never had it blank out. I also use a Thermoworks 'Smoke' and one probe is on a clip on the rack to measure the air temperature, this is the one I go by. The stock one is just for grins.
Agree with keeping the box full and an eye out on the coal bed to ensure it is covering the intake holes. Also, keep the lid on. The fire is cool to watch, especially in the dark, but you will consume wood faster.
Agree with not messing with firebox while fan is drawing. Many users use a switch or unplug the controller to turn off both fans so that the draw fan can't kick on while messing with firebox.
Do check poppets after adding wood, this is when they can be accidentally adjusted. A trick is to use a small binder clip to keep them in place.
I'm going to suggest not using gloves to lift the lid. It is designed to be lifted with your fire tending tool. Before using practice lifting the lid off with it and spinning it for orientation so you can put the lid back on. Also I wouldn't store the tool on the door, use the first small hole on the firebox to insert the tip of the tending tool into and have the handle over the controller. It stays secure, out of the way, and the handle won't heat up.
I use a stainless steel steam table tray to collect drippings, they are sized to slide into the cook box like the racks. Very durable, will last forever, and easy to clean.
Have lots of wood cut to size before you start, way more than you think you'll need. I put mine in milk crates and always have a couple of crates left over. I don't want to be trying to get more wood while cooking.
Agree on not doing a full load until you have several cooks under your belt so that you know all the nuances of the cooker. Even then, leave room for airflow.
I'd say after a few cooks you'll wonder why you even worried about anything. It's easier than riding a bicycle.
Comment
-
Great advice by Ricardo and ComfortablyNumb I agree that that with a little practice you can handle the lid readily with the provided tool. While feeding or tending the firebox, hang the lid on the lip on either side of the firebox.
I've included a photo from the food box as well. Costco St. Louis Ribs, about halfway done now. It's what's for dinner tonight. I'm using the tips from SpinakerTroutman. Thanks to the members of AR, you can always ask for help. BTW, the toothpicks in the upper left rack marks the ribs without a lot of cracked pepper, for the 1, 2, 3, 4 & 6 year old grandkids!
and
Comment
-
Thanks for all of the advice and tips, ComfortablyNumb, Spinaker, hogdog6, Ricardo and @new2smoking.
Threading the probes through the gap where the firebox fits into the main body and feeding them into the chamber through the top louver was a poor idea. The probe wires can't tolerate the heat that passes through there. I've drilled out the holes at the top-front corners 1/32" larger so my probes will fit through. That increase shouldn't affect performance.
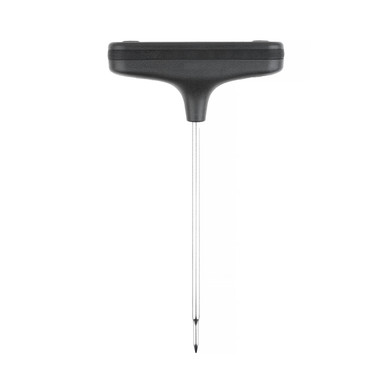
Regarding the controller hole for the included instant read thermometer–
​
The instant read thermometer shaft wouldn’t fit through the controller hole. Consequently, the thermometer’s metering tip didn’t reach the hole in the top of the cooking chamber.
The hole in the cooking chamber is the same size.
I enlarged the controller hole. Now the metering tip reaches through the hole in the top of the cooking chamber. I haven’t tested it, but I think I can now compare the instant read temperatures to those I measure mid-chamber and, ultimately, develop a usable relationship.Comment
-
I know I'm late to the party, but here's how I solved the probe problem. Just tape down the wires and run the probes through the fan hole. Electrical tape probably works better than painter's tape.Comment


Comment