Instagram AmazingRibs Facebook AmazingRibs X - Meathead Pinterest AmazingRibs Youtube AmazingRibs

Welcome!


This is a membership forum. Guests can view 5 pages for free. To participate, please join.

[ Pitmaster Club Information | Join Now | 30 Day Trial | Login | Contact Us ]

Only 4 free page views remaining.

Announcement

Collapse
No announcement yet.

The next build - the MK48.2! 250-gallon on a yard cart.

Collapse
X
 
  • Filter
  • Time
  • Show
Clear All
new posts

    The next build - the MK48.2! 250-gallon on a yard cart.

    Took an order for a new pit - something I said I wasn't going to do.

    I like to build them all different. I like to experiment, I like to 'stretch my wings', I like to explore the creative side of different designs and types of smokers. But, coulpa local guys, good fellas, teachers both, have a BBQ team and they wanted me to build 'em one. They looked up my first MK48 I did here and decided this was what they wanted, almost exactly. So... there'll be a few changes to the specifics, but the basic design will be almost the same.

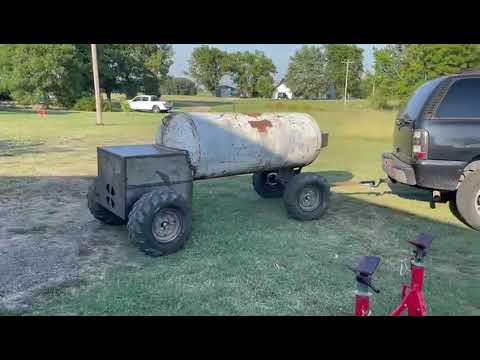
    Here's the original MK48:

    Click image for larger version

Name:	image.png
Views:	381
Size:	9.45 MB
ID:	1632033
    It'll be approximately the same, but slight differences in the firebox, and I'm going to actually put some insulation in the corners, instead of just an air gap. I'll be bringing the insulated lower corners up higher to protect the wheels and avoid having to do heat shields like I added to the original, and I'll be using some ceramic fiber insulation to do a better job of it. Also a folding stack, more thermometers and some electronic probe ports, but otherwise, about the same.

    So I got started last week cutting panels for the firebox. My cheapie plasma cutter ain't the greatest, but I can generally cut all the square panels pretty well. Oh, this firebox will be all 1/4" material. The last was 3/16" and it worked fine, but I just felt like from now on, I wanted to use 1/4" to make it a little heavier and more durable. And I had a couple of sheets of 1/4" sitting around. Although... they've been sitting around a long time. Like, a year and a half or so, out in the weather. Which means, of course... rust.

    As you can see...

    Click image for larger version

Name:	image.png
Views:	327
Size:	10.80 MB
ID:	1632034
    Luckily, I have just the right tool for THAT job. The Harbor Freight "surface conditioning tool" does a great job on this. The rotating 40-grit drum made of some kind of nylon, I think. Strips rust and paint and such really, really well. This one was pretty badly rusted, so it took me about 21 minutes (I timed it) to clean it off, but it did a great job of it.

    Click image for larger version

Name:	image.png
Views:	326
Size:	9.53 MB
ID:	1632035
    Some of the panels cut out - not everything, but most.

    Click image for larger version

Name:	image.png
Views:	329
Size:	10.97 MB
ID:	1632036
    Started fabrication of the firebox, I think Sunday. Bottom floor is double layer of 1/4", and I drilled a bunch of 1/2" holes to do plug welds and make it solid, essentially 1/2" floor.

    Click image for larger version

Name:	image.png
Views:	323
Size:	7.44 MB
ID:	1632037
    Now welded together:

    Click image for larger version

Name:	image.png
Views:	319
Size:	4.99 MB
ID:	1632038

    Put in the 'wings' to give a bit of a "V" to the bottom of the firebox.

    Click image for larger version

Name:	image.png
Views:	322
Size:	8.16 MB
ID:	1632039
    One of the panels had a bit of a 'bow' in it, so I had to break out the 10-ton power ram (another absolutely WONDERFUL essential tool from Harbor Freight) to get this straight so it could be welded properly.

    Click image for larger version

Name:	image.png
Views:	326
Size:	7.24 MB
ID:	1632040
    And this was where I left it on Sunday. Bottom half of the firebox all welded up.

    Click image for larger version

Name:	image.png
Views:	312
Size:	7.94 MB
ID:	1632041
    Monday and Tuesday were both over 100ºF, and after work at the office, I was just too wiped out in the heat to go out and do anything.

    Next post, today, Wednesday...

    #2
    So today it was back to work on the firebox.

    Got the top tacked in place, had to use the ram again to get it all straightened out and lined up - none of the steel plates I've ever gotten have been truly flat, I don't shell out for the "Grade AA" steel or whatever it is, I can work with some small bows. But it takes a little more time and effort.

    Click image for larger version

Name:	image.png
Views:	326
Size:	5.67 MB
ID:	1632043
    Then stuffed the ceramic fiber insulation (left over from my first build, The Duk) into the corners. I was debating should I pack it in loosely or tightly? I dunno, I've heard loosely is better, but I decided to stuff as much insulation in there as I could get, ramming it in with a long rod and packing it tight.

    Click image for larger version

Name:	image.png
Views:	310
Size:	5.43 MB
ID:	1632044
    Click image for larger version

Name:	image.png
Views:	318
Size:	8.01 MB
ID:	1632045
    Got it all welded up and the firebox is all but done:

    Click image for larger version

Name:	image.png
Views:	324
Size:	10.27 MB
ID:	1632046
    Click image for larger version

Name:	image.png
Views:	306
Size:	9.53 MB
ID:	1632047
    Click image for larger version

Name:	image.png
Views:	311
Size:	9.13 MB
ID:	1632048
    Click image for larger version

Name:	image.png
Views:	303
Size:	5.69 MB
ID:	1632049
    Next just have to add hinges and door handle and weld on the scoop/baffle on the throat opening.

    Then, get to work on the axles and the tank.

    I've got 4 days off to get some serious work done starting tomorrow, and the weather actually looks like it's going to cooperate and stay reasonably cool, meaning less than 100ºF!

    Stay tuned!

    Comment


      #3
      Click image for larger version

Name:	jared-guynes-jared.gif
Views:	299
Size:	983.1 KB
ID:	1632056


      ...


      ...

      Comment


      • barelfly
        barelfly commented
        Editing a comment
        Hahaha! This may be top 5 post of all time!

      #4
      I admire your skill and ability to work these cookers to what you want! If you were closer to me, I’d be bugging you to watch and learn! Love it…and love that you share this with us!

      Comment


      • realdocBBQ
        realdocBBQ commented
        Editing a comment
        I'm learning as I go, and learning more and more tricks of the trade. It's a fun journey, and I like to document for others, someone else may learn something and use it for another purpose or whatever. It's cool.

        Maybe I'm getting my validation through this, since I don't feel I do much else to contribute to anything these days. lol

      #5
      Hmm. just realized I haven't updated this. Of course, I didn't get much done this week, I don't think. Lemme go up and look at my last post and see where I left off...

      Ok, now I'm refreshed.

      Ok, welded the throat opening scoop/baffle on the other day. Similar to what I did on the Mk48 - I don't remember the exact dimensions of that one, but this one is the same opening, roughly 12" wide at the bottom and 21" wide at the top (I think), about 8.5" tall. So, we're looking at about 140 square inches of area, give or take. Much larger than what is needed for a 250g with this firebox. I like it large, I dislike restriction in airflow. At the lower end, it is 2.5" away from the throat, at the top, 3.5". So the vertical baffle is slightly angled, outward, toward the cook chamber. Pics:

      Click image for larger version  Name:	image.png Views:	0 Size:	8.50 MB ID:	1635551Click image for larger version  Name:	image.png Views:	0 Size:	8.45 MB ID:	1635552Click image for larger version  Name:	image.png Views:	0 Size:	8.30 MB ID:	1635553Click image for larger version  Name:	image.png Views:	0 Size:	9.06 MB ID:	1635554
      As you can see, it is open at the bottom and the top. I hope to do some more experiments with this smoker to further determine the utility (or lack thereof) of this design. We shall see.

      I had to wait on my idler hubs and my wheel spacers/adapters (for the bolt pattern) to come in, to get the true dimensions I would need for my axles - again, I don't keep good records, I couldn't remember how wide I should make these. Ended up choosing 40" for the axle width.

      Click image for larger version  Name:	image.png Views:	0 Size:	4.79 MB ID:	1635555
      This will allow about 3" from the sides of the 26" firebox to the insides of the ATV tires. Now, most builders will say this isn't enough, and indeed, even with the angled 'partially insulated' sides on the inside of the Mk48 firebox with an air gap, they did get too hot, necessitating the construction of some guards to be placed between the tires and firebox. Actually, not really for the 'insulated' portion, but that insulated portion didn't come up high enough, and the top portions of the tires were too hot. So I created the shield to protect the tires long term. THIS box, for the Mk48.2, I brought the baffles up higher on the inside of the firebox AND I actually stuffed in ceramic fiber mat for insulation. I hope this makes enough of a difference to eliminate the need for reflectors between the firebox and tires. We shall see if my efforts were effective in this endeavor.

      Onwards...

      So, once I got the axles cut, marked, drilled and then plug welded in the spindles and hubs, I added the tires and determined placement of the axle on the bottom of the firebox.

      When I stepped back and looked at the full assembled (but not yet welded) axle, I noticed something... disturbing.

      Click image for larger version  Name:	image.png Views:	0 Size:	7.38 MB ID:	1635556
      As you may appreciate, in this picture, the wheels have a decided... camber problem. While, I have seen this on some smokers, giving them a 'low rider' appearance, with a negative camber, it actually looks kind of cool on some smokers with the right style. BUT... in this picture, the firebox is UPSIDE DOWN, which means when assembled, the smoker would have POSITIVE camber, and would look exceptionally... silly. Additionally, I was quite perplexed, because I made CERTAIN I welded the spindles into the axle as perfectly straight, flat and NON-cambered as I could, or at least I THOUGHT I did!

      When I examined them more closely, what I found was that I had just basically mounted my wheels on lightly to the hubs and the lugnuts were NOT, in fact, fully tightened down, thus allowing the wheels to sit unevenly. WHEW! When I adjusted them and tightened them down better, the wheels DID in fact sit more evenly and the camber problem disappeared. Thank God!

      So, then I carefully measured, marked, remeasured and adjusted about 20 times to make SURE I was getting this even (front to back, left to right and square with the firebox), and finally welded the rear axle in place.

      Click image for larger version  Name:	image.png Views:	0 Size:	4.79 MB ID:	1635557
      I then took the firebox out behind the shop and spray painted the bottom of the box and axle and sides of the axle (no pics) so that it wouldn't immediately begin rusting, as this portion will be exceedingly difficult to get any kind of coating on later, once it is mounted to the tank.

      Doesn't seem like a got a lot done for a whole Saturday. But it takes a while to drill all the holes perfectly in the drill press for the axles, using a step bit to make 1/2" holes on 3 sides, 6 per wheel, as well as drilling a larger 1¼" hole in top and bottom of the front axle to allow a 5th spindle to be the rotating part for steering later on. I'll also add in a couple of 3/16" or 1/4" plates for further stiffening of the front axle, later. Also need to fabricate a bracket for the front axle to attach a pull bar, and I may do something that will allow attaching a hitch to pull it around the yard with a lawn tractor. Wanted to do that for the last one, as it was a heavy beast for me to move by myself, but this one will be much heavier, as the tank is a lot thicker and the firebox is all 1/4" instead of 3/16. So... yeah, pretty high priority, there, I think.

      Also, affecting my ability to get too much done today, I spent about an hour and a half weedeating around the shop in various spurts (95ºF, heat index in the 110s somewhere) and taking lots of breaks. It was a rough day. Hot. And. Long. Pretty wiped out exhausted right now.

      Anyways, tomorrow prolly work on the front axle some more, may get around to cutting the firebox opening on the tank. Not sure yet. We'll see what strikes me.

      Comment


        #6
        I would not waste my time with anything smaller than a 250 gallon. We are supposed to be 101 tomorrow then a cool down next week with some highs not getting above 92-93.

        Comment


        • realdocBBQ
          realdocBBQ commented
          Editing a comment
          I think today we're 96 again with a heat index of 114. <sigh> I was wiped OUT last night. And I still got a loooong ways to go with this stuff.

        #7
        No idea how I missed this thread until now. I love following along with your builds.

        Comment


        • Smoker_Boy
          Smoker_Boy commented
          Editing a comment
          Because you're old and have the attention span of a gnat.

        #8
        Too damn hot down there! I don’t know how you do it. You have my total respect.

        Comment


        • realdocBBQ
          realdocBBQ commented
          Editing a comment
          Only 91 today, supposed to be 80s this week. Hopefully can get a LOT of work done this week. Have to wait on some stupid tubes for the tires, though, that's gonna be a coupla days. Dammit. I may be kind stuck until then.

        #9
        Did get much done throughout the week, I don't even know what I did. I know on Thursday, I sat on my ass, first day "off" in... shit, who knows. Weeks, months? I dunno. I generally am at the office or shop every day, 7 days a week, and at least 4 of those, both office and shop. But, Thursday I did freaking NOTHING. Well, except Fireboard testing... oh, whoops, Never mind that. Anyways...

        Saturday, who knows what the hell I did. It was stupid hot, I think I got heatstroke, or at least heat exhaustion, I was a mess coming home and don't remember even what I did for the day.

        Today, I went out earlier (and stayed late anyways), but stayed indoors more in the shop, with fans going. Still 101ºF, heat index in the 110s somewheres, who knows. But I did get more accomplished today and even though I didn't really take many pics, they say a picture is worth a thousand words... well, what is a video worth? A thousand pictures? A million words? Hell, I dunno, but here's what I got.


        I basically over the last 2 days got her on 4 wheels and got the firebox mounted. She's finally mobile. Made a pull bar with a trailer coupler, so I could pull her around with the truck - this one is too damned heavy to get her in and out of the shop every day by hand, by myself. I'm not sure how it's going to work with TWO rotating points, the front axle and the hitch mount. I may need to try to find a way to lock the axle, like a drop-in pin or something, but I'm not sure how that would work, being that the rear and front axles are 8 feet apart. I dunno. I'll work on trying to back her up into the shop some this week and we'll see if it's even possible - it may not be.

        Only 2 small injuries today. This was one of them.

        Click image for larger version  Name:	image.png Views:	0 Size:	4.84 MB ID:	1638503
        And now this evening:

        Click image for larger version  Name:	image.png Views:	0 Size:	6.74 MB ID:	1638504
        Not such a big deal, just a long scrape/scratch, but The Wife thinks these things are evidence someone is going to find me crushed to death out in the shop - well, maybe that's true, but this isn't proof. Or positive predictive evidence or anything like that. lol

        The other injury was just a grinder disc nick on the back of a thumb knuckle. I've had a zillion of those. No big deal.

        So, I'm on my way - this one's already sold, so that's good, I won't be sitting around waiting for someone to decide they want it. Then I can get on with... of course... the next one! lol

        Comment


        • Jerod Broussard
          Jerod Broussard commented
          Editing a comment
          Those pipe stands are the bomb. Using one of those and my welding table I somehow welded two pipes together STRAIGHT.

        #10
        Got a little something done today.

        Click image for larger version

Name:	20240829_171341.jpg
Views:	230
Size:	3.77 MB
ID:	1639797
        Click image for larger version

Name:	20240829_171348.jpg
Views:	239
Size:	3.41 MB
ID:	1639796

        Comment


          #11
          A bit more work done this weekend.

          Friday I stayed home, don't even remember what I did. Nothing I think. Laziness. I mean, I worked half a day, at the office and the nursing home, but then came home around... 1 or 2, and just sat on the back porch and read a book I think. I dunno.

          Anyways, Saturday I went out and spent the day working on the doors. Got the door handles welded down, built the rolling door handles - these are 1/2" round bar run through the door handles and 3/4" black pipe over them. The round bar is plug-welded through the pre-drilled holes in the door lift handle brackets and the black pipe is just sheathed over this. It makes for a nice-feeling handle that rolls loosely but is solid and secure, NEVER gonna go anywhere.

          Also did the door trim. 1.5" 1/8 flat stock, trimmed to size, side pieces rolled in my rolling tool, then meticulously marked and measured. I spend a lot of time doing this step on each smoker, as I like to attach the door trim with just spot welds, and I like them to be spaced evenly and have a pretty uniform appearance. Not EXACT, like, robotic or machined, but just relatively manmade uniform. I dunno, it's my thing, this is how I like doing it.

          Anyways, pic of completed door handles and trim:

          Click image for larger version  Name:	image.png Views:	0 Size:	9.93 MB ID:	1641059
          Yesterday, Sunday, I decided it was time to tackle the stack. This is my first stack that will fold along the tank. My last build, The Bronco, I did the stack folding down forward, this will fold back down the length of the tank. Now, the pipe I planned to use for this exhaust is... heavy. I'm short in this area trying to find light-walled large pipe. I mean, if I could find Schedule 10 in a 6" size I'd be in HEAVEN. Unfortunately, I've had to scrounge all the time to find 5-8" pipe showing up at a decent price and you kind of take what you get. It's maddening.

          So this pipe is a 7" OD and 3/8" wall thickness. It's heavy stuff. Spent the first half of the day measuring, trimming and molding the end of the pipe to the collector box, then getting it set in place, tacking the bracket onto it and then slowly welding a small portion and letting it completely cool, welding again, cooling again, etc. I wanted to be very careful not to warp the folding bracket, as this is the most critical piece of the whole exhaust in making sure the folded down portion comes out right in terms of its alignment with the long axis of the tank, AND I want it to lay perfectly parallel, so it looks even going down the tank when viewed from the side. In other words, I want it to look horizontal, and not angled up or down. It's a bit of work to get things lined up right, and once I got the lower exhaust piece mocked up and put the bracket in place and measured, I realized I had forgotten to account for a couple of things and had to cut some more off the pipe, another 2 3/16" or something. I dunno, anyways, the point it, it was a bit of meticulous fitup, trim, mockup some more, shave a little, get it just right, blah blah blah.

          Got that all done, welded in place (my God, my vertical welds still look like complete f***ing dog turds - thank God I've got good grinders - and lots of practice using them! UGH!

          But... the top portion, the part that actually folds.

          Holy. Carp.

          So this portion ended up being aboooout 54" long (I think 53 5/8, actually?) and when calculating weight online, looks like about 120 lbs. It's a beast. I had no help in the shop, as I messaged my friend whose shop I use to see if he could come help me lift it into place, but he was up in KS visiting family. So it was up to me. Dammit. But I managed. It was... touch and go, probably would have looked pretty comical, probably not the safest of things I've done in the shop in my time, but I got the thing up on the bracket, standing upright and go the level on it, it was remarkably close, so I quickly threw some tacks in place to keep it from shifting, but then had to quickly put down a couple of 2" weld beads to REALLY hold it. I was sweating the whole time this thing was going to come crashing down at the slightest provocation. Sitting on top of the bracket on the collector and the lower exhaust portion, it was about 54" off the ground and 54" tall - I didn't plan that, I have no idea how it happened, but it did. I was a bit amused when I set it down on the shop floor next to the collector that it was EXACTLY the same height as the top of the fixed exhaust portion. I couldn't have probably accomplished that if I tried, but it just happened that way. Weird.

          Anyways, went through the same weld/cool/weld/cool process and got it done, no significant noticeable warping of the bracket and it looked liked up pretty well - this was meticulous as well. Using lasers and such to try to make sure everything was where I wanted for 'folding' before welding anything.

          Then, laying down this 120-pound behemoth so I could get the 'saddle' for it to set in lined up properly and in place and then weld it... well... let's just say you should plan these things better. My hand is a little swollen and bruised from where I ended up getting it caught between the folded exhaust and one of the hinges on the top of the door. That was an interesting (and FAST) exercise trying to get this thing pried up to get my hand out. But I somehow did it. After that, used some various accoutrements to lift the stack just a few inches so I could get the 'saddle' standoff under it, get it aligned well and then weld it in place. The saddle is just about a 4" wide piece of 1/4" steel, radiused on one side for the 30" tank and the other side for the 7" pipe. It worked out well.

          Overall, it was a lot of measuring, trimming, cutting heavy pipe with grinding wheels and meticulous welding and cooling. But I got it done.

          Here we are as of now.

          Click image for larger version  Name:	image.png Views:	0 Size:	9.46 MB ID:	1641060
          Click image for larger version  Name:	image.png Views:	0 Size:	9.94 MB ID:	1641061Click image for larger version  Name:	image.png Views:	0 Size:	8.84 MB ID:	1641062Click image for larger version  Name:	image.png Views:	0 Size:	8.34 MB ID:	1641063Click image for larger version  Name:	image.png Views:	0 Size:	10.48 MB ID:	1641064
          I think it's going to take Andre the Giant to overhead press that stack into vertical position. You just cannot get up under it well enough leaning over the tank for good positioning for lifting. It's going to need some hooks or something to latch onto with pushbars and probably 2 people. I dunno. It's a monster. It's insane. But hey, that's what they wanted.

          And the one I'll be doing when I build a 500 is 10" pipe, same 3/8" or so thickness, will also likely be LONGER. So I can easily guess a couple hundred pounds or more for that one.

          Anyways, that's where I am now. Stack is done except putting the stack damper on top with the control rod coming down to rotate it, and the eyelets for the control rod. I can work on those sometime.

          Today, I start on internal racks/grates. Assuming I can get a hand getting that stack lifted out of the way so I can get the doors open! lol

          Wish me luck!

          <edit> Now that I thnk about it... climbing up on the tank is probably the only way to get this lifted up or down solo. Not that climbing on top of a rounded tank 5 feet n the air is a safe plan, but... well, ya do what ya gotta do, right? And I do pretty much everything alone, so... hopefully no one finds me dead on the shop floor with a cracked melon. lol I wouldn't be the first guy, would I? lol
          Last edited by realdocBBQ; September 2, 2024, 07:14 AM.

          Comment


          • Dan Deter
            Dan Deter commented
            Editing a comment
            Could you weld a ring on there that a chain or rope could be attached to to be able to pull it up?

          #12
          Update from the holiday.

          Rack building! This means we're getting close to completion!

          I've found getting the smoker as level as possible (sometimes a challenge, given the shop floor is anything BUT) and then using my laser level to mark lines is the best way to go about this.

          Click image for larger version

Name:	image.png
Views:	166
Size:	1.97 MB
ID:	1641663
          Click image for larger version

Name:	image.png
Views:	153
Size:	1.91 MB
ID:	1641664
          Click image for larger version

Name:	image.png
Views:	157
Size:	1.96 MB
ID:	1641665
          Ran a couple of rails lengthwise along the cook chamber, then got to work on building the frames.

          Click image for larger version

Name:	image.png
Views:	151
Size:	1.45 MB
ID:	1641666
          Lower racks fully built (need cleaning up, no biggie)

          Click image for larger version

Name:	image.png
Views:	153
Size:	2.23 MB
ID:	1641667
          Click image for larger version

Name:	image.png
Views:	155
Size:	2.28 MB
ID:	1641668

          Then measuring and marking for upper racks.

          Click image for larger version

Name:	image.png
Views:	153
Size:	2.28 MB
ID:	1641669
          Click image for larger version

Name:	image.png
Views:	149
Size:	1.77 MB
ID:	1641670
          Click image for larger version

Name:	image.png
Views:	147
Size:	1.53 MB
ID:	1641671

          Marked the walls for the upper racks yesterday before quitting early to go home and cook ribs. Will likely do the upper racks this afternoon/evening.


          Then all I've got left is... hrrmmm...

          Exhaust damper and control rod. Firebox door hinges and handles. 1.5" drain.

          What else....

          Oh yeah, thermometers and probe ports. And d-ring tie downs, just ordered these, so they'll be here Thurs.

          Oh yeah, I've gotta finish welding up the firebox.


          So I think it'll go for sandblasting Thursday, or maybe Friday at the latest, assuming the world don't end. Prolly wait to do thermometers and d-rings until it comes back from sandblasting. Or we'll see how soon he can get it in and how quick I can get the other stuff done.

          Comment


          • realdocBBQ
            realdocBBQ commented
            Editing a comment
            Oh, and grinding. Lots of grinding down some ugly ass welds. Lol. Prolly oughtta get the firebox welded soon so I can get all the grinding done at once. Hehe.

          #13
          Really enjoying watching this post and build. Thanks for sharing. Very impressed.

          Comment


            #14
            Today's project - upper racks.

            Click image for larger version

Name:	20240903_181308.jpg
Views:	175
Size:	4.06 MB
ID:	1641818
            Click image for larger version

Name:	20240903_180632.jpg
Views:	180
Size:	3.53 MB
ID:	1641817
            Click image for larger version

Name:	20240903_180641.jpg
Views:	184
Size:	4.34 MB
ID:	1641819

            Comment


            • RiverJeff
              RiverJeff commented
              Editing a comment
              This project is going so smooth! Also like the shelves stops great idea!

            #15
            Almost done. Finished out the firebox today. I got it all welded up - my overhead welds on the underneath were actually pretty good - the vertical welds on the sides of the firebox joining the the cook chamber were my typical "ready to be ground flat" version. lol

            Door had been still attached by 3 small tabs left in place when it was plasma cut. Spent a good long time lining up the hinges, getting everything right, straight and even, then drilled the holes (3/8") for the pinwheel damper and the door handle, attached the door handle standoff and added 5½" pieces of ½ round bar as handles.

            Click image for larger version

Name:	image.png
Views:	132
Size:	5.79 MB
ID:	1642595Click image for larger version

Name:	image.png
Views:	115
Size:	5.85 MB
ID:	1642596Click image for larger version

Name:	image.png
Views:	115
Size:	5.25 MB
ID:	1642597
            Those 2 straight out pieces of round bar stock will both have spring handles after this gets sandblasted, so they'll be cool to the touch.

            That's one big pockin' door. A decent-sized human could crawl in there comfortably. Prolly give Hansel & Gretel some flashbacks, I'd imagine.

            Not a lot left. Intentionally shut it down early today, as my sandblasting guy is backed up and I can't get that done until next week, so there was no point in really hurrying or pushing. I've got the whole weekend to tidy up the few little things left.

            1. Exhaust damper and control rod.
            2. 1.5" grease drain
            3. 4 thermometers and 2 wired thermometer probe ports
            4. 4 D-rings to weld on as tie-downs for when being trailered

            Honestly, a couple hours' worth of work is all. And then once it's sandblasted and allowed to develop some rust, I'll fire it up and apply linseed oil to the exterior to seal it.

            Guess it's time to start figuring out what to do with the next one...

            Click image for larger version

Name:	image.png
Views:	116
Size:	11.53 MB
ID:	1642598
            Click image for larger version

Name:	image.png
Views:	120
Size:	10.68 MB
ID:	1642599


            Stay tuned fer that one!

            Comment


            • Jerod Broussard
              Jerod Broussard commented
              Editing a comment
              You're posting too many pictures. By the second pic I'm watching 14 propane tanks on Facebook Marketplace.

          Announcement

          Collapse
          No announcement yet.
          Working...
          X
          false
          0
          Guest
          Guest
          500
          ["membership","help","nojs","maintenance","shop","reset-password","authaau-alpha","ebooklogin-start","alpha","start"]
          false
          false
          Yes
          ["\/forum\/free-deep-dive-guide-ebook-downloads","\/forum\/free-deep-dive-guide-ebook-downloads\/1157845-paid-members-download-your-6-deep-dive-guide-ebooks-for-free-here","\/forum\/the-pitcast","\/forum\/national-barbecue-news-magazine","\/forum\/national-barbecue-news-magazine\/national-barbecue-news-magazine-aa","\/forum\/national-barbecue-news-magazine\/national-barbecue-news-magazine-aa\/bbq-news-magazine-2019-issues","\/forum\/national-barbecue-news-magazine\/national-barbecue-news-magazine-aa\/bbq-news-magazine-2020-issues","\/forum\/national-barbecue-news-magazine\/national-barbecue-news-magazine-aa\/bbq-news-magazine-2021-issues","\/forum\/national-barbecue-news-magazine\/national-barbecue-news-magazine-aa\/bbq-news-magazine-2022-issues","\/forum\/national-barbecue-news-magazine\/national-barbecue-news-magazine-aa\/current-2023-issues","\/forum\/national-barbecue-news-magazine\/national-barbecue-news-magazine-aa\/current-2024-issues","\/forum\/national-barbecue-news-magazine\/national-barbecue-news-magazine-aa\/current-2025-issues","\/forum\/national-barbecue-news-magazine\/national-barbecue-news-magazine-aa\/current-2026-issues","\/forum\/bbq-stars","\/forum\/bbq-stars\/tuffy-stone","\/forum\/bbq-stars\/meathead","\/forum\/bbq-stars\/harry-soo","\/forum\/bbq-stars\/matt-pittman","\/forum\/bbq-stars\/kent-rollins","\/forum\/bbq-stars\/dean-fearing","\/forum\/bbq-stars\/tim-grandinetti","\/forum\/bbq-stars\/kent-phillips-brett-gallaway","\/forum\/bbq-stars\/david-bouska","\/forum\/bbq-stars\/ariane-daguin","\/forum\/bbq-stars\/jack-arnold","\/forum\/free-deep-dive-guide-ebook-downloads"]
          /forum/free-deep-dive-guide-ebook-downloads