


And one more improvement, Spider Grills makes a cart for the 26 that it desperately needs. Its not only wobbly, its rickety. And I move the Kettles around a lot on and off the patio. But it won't be in stock till this summer .
-
Last edited by Lynn Dollar; April 22, 2026, 08:14 AM. -
I used a different approach with more hardware. I got a universal mount for the fan that I ordered from Thermoworks. It fits perfectly into a Guru adapter. See Guru Universal Adapter | BBQ Guru It makes an airtight and very clean looking setup. This is a very easy installation. I got a nice step drill from Amazon to drill the hole. The drilling was not difficult. You drill a small pilot hole into which you fit the step drill. Drilling the pilot hole keeps the step drill from wandering around as it gets started. The enamel finished kettle is pretty hard material, but the pilot hole allows you to accurately place the step drill. The step drill is noisy. Earplugs recommended. Take care in selecting where to mount the adapter. You want to avoid blocking the handle for the ash sweeper/vent covers.
Some step drills are soft metal and don't work well. This one from Amazon is $20 and works very well:
Amazon.com: Jerax tools M2 HSS Quick Change 3/16" - 7/8" Step Drill Bit Double Fluted Drill bits for Hole Drilling in Stainless Steel, Copper, Aluminum, Wood, Plastic : Industrial & Scientific
I use a snake method (in a circle around the edge of the charcoal grate) to place my charcoal in the Weber kettle for low and slow. I start the snake on one end with 4-5 lit coals that I start in a chimney. This allows me to establish a temp of 225-250 without overshooting. You don't want to overshoot your temp as it is hard and slow to get it back down.
Once you are cooking at your desired temp, it takes very little air from the Billows to maintain your temp. I use a yellow damper in the Billows fan. I shut it down to an opening of only about 3/8" or so. Once you establish your temp, the Billows will hold it there with no more adjustments needed. It is very close to set and forget. In a 5 hour cook, I normally burn the briquettes about halfway around the edge of the kettle. Very efficient! I use Cowboy brand briquettes because they burn hot and clean. The snake is two briquettes wide and one on top. For smoke, I place hunks of hardwood on top of the snake. For a five-hour cook, I use about 4 chunks spaced every 4" or so. You can vary the amount of wood to adjust to your preferred level of smokiness. I prefer light to moderate smoke.
This setup has worked amazingly well for me. I can set a temp and not go more than 4-5 degrees high or low off of that during the entire cook. I do not use a gasket on my lid. When I was building this set up, I thought a gasket would be needed but I don't think it is needed and I have never installed one. However, I have heard that some Weber kettle lids leak air more than others, so you need to check out how your unique kettle performs.
I have not used the new Weber smart ring, but I have no need to buy one now. Looking at the Weber smart ring, I fear that the thermocouple may not be in the best place. With my setup, I use Thermoworks probes. Usually, two for ambient temps placed on the grill grate on opposite sides of the kettle. This gives me very accurate data on what is happening near my meat, and I can vary the position of the probes to suit the size and placement of the meat on the grill. And Thermoworks temp gear is the gold standard for heat management. I have 4 Thermoworks receivers but I usually use the Smoke X with the remote. The range and reception are very good. I can monitor my cook from my upstairs bedroom.
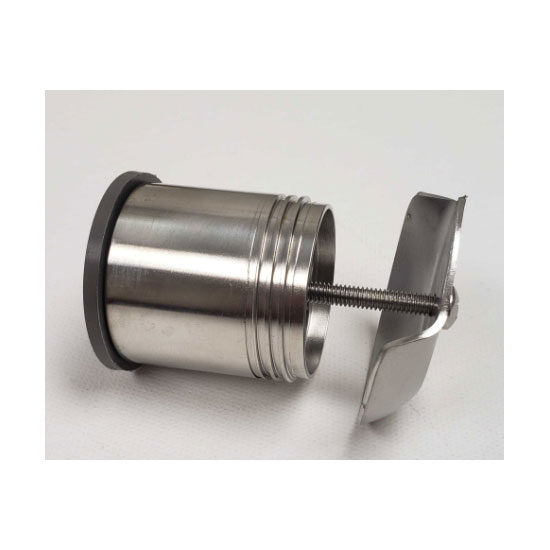
Below is the Guru adapter. The kettle wall goes between the four parts, two inside the kettle and two outside. The screw goes through the hole in the kettle and attaches to a nut that is inside the tube (not visible in the picture below.
Below is the Billows universal adapter that fits into the Guru Adapter. The universal adapter is only $5.99. The Guru adapter is a spendy $37.50. The fan snaps right on to the universal adapter. This makes a very solid and clean looking connection to the weber kettle.
Last edited by briano52; April 21, 2026, 01:45 PM.Comment
-
What size hole did you drill for the adapter ? I drilled a 1 " hole . I like how that gets the Billows further away .
I've done three rib cooks on Kettles the past month. Two of them, I ran a snake. The last one I used the SnS. I liked the snake better, it controls how many briqs are burning at one time. Unless the briqs are neatly placed in the SnS, fire can spread to more briqs. I had better manual control of the snake than the SnS, which the SnS ran away from me twice. -
Hi Lynn. I don't remember the size of the hole. It was either 7/8" or 1". I made the hole so that the Guru adapter would fit snugly in it. Me too on the snake versus the SnS. I prefer the snake as it is easier to hit my temp and not go over with a snake than it is with the SnS. The SnS does work for certain cooks, but when I am using the fan, the snake works better. That said, I haven't experimented with the SnS and the fan very much. Maybe there is a way to keep the SnS under better control. -
Brian,
You are using the wrong adapter. That square metal plate is the BBQ Guru Kamado adapter. You do NOT use that for a kettle! Just the outer round tube, and the inner diverter that points the air DOWN. I was wondering why the heck you had foil tape on the outside of your kettle and then saw that square plate you should not have used.
I've bought numerous of the universal adapters, and they just come with the two parts plus the screw. It looks they sent you a kamado adapter.
-
-
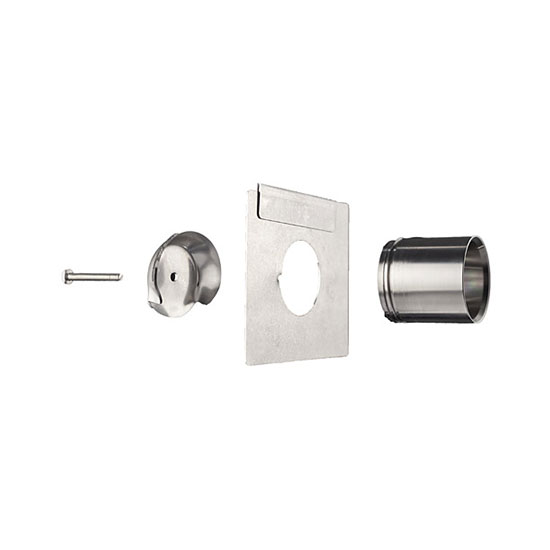
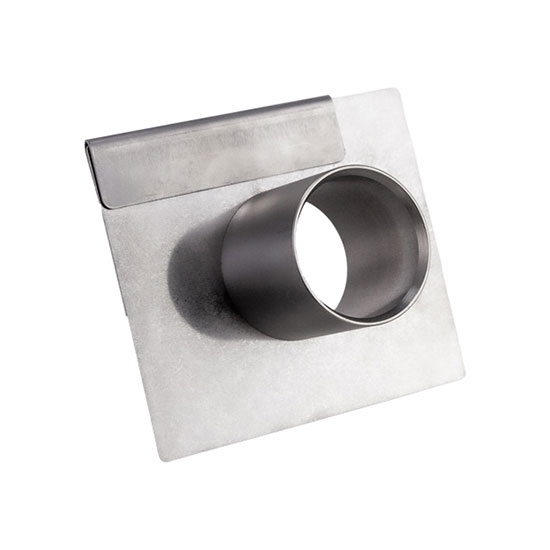
briano52 your photos reveal that you somehow received and installed the BBQ Guru UNIVERSAL adapter on your kettle, rather than the universal/Weber adapter. The universal kit includes a metal plate intended for use on ceramic Kamado cooker vents. Here is what you should see on the outside of the kettle:
That square metal plate with the little sliding part is so that you can mount the universal adapter to it, and then mount the entire thing into the slot of a kamado vent, as you can see in the photo below. The little movable piece on the top of the metal plate is what you slide UP into the slot to lock it onto the kamado.
Just thought you might want to know, as that would let you lose the tape on the outside of your kettle. The GURU adapter pulls down flush enough to the kettle body WITHOUT that metal plate that you had to seal with foil tape.
THIS is the Weber kettle adapter:
THIS is the Universal adapter, that just adds a kamado plate to the same adapter:
What I use with my kamado is actually not the universal, but a kamado specific adapter:
Comment
-
Comment
-
For me to go to that BBQ Guru set up, would cost $55 total, that includes shipping for both products.
All I would gain is separating my Billows further from heat of the bottom of the Kettle. The Thermoworks vid I posted above, connected directly as I've already done. I would think if there was risk of damage to the Billows, they'd done something different.
I guess it might be a bit easier to connect the Billows, rather than bending those springs.
Comment
-
You don't need it. I am only using that adapter for the Billows because I already had a Guru adapter on my kettle and had one for my kamado. I see zero issues putting the Billows on that smoke hole you drilled. And as LegoMySearwood points out, the high temp silicone plug may (or may not) seal more air tight than the sliding plate.
-
-
I asked ThermoworksOriginally posted by Lynn Dollar View Post
Hi Lynn,
It is understandable to be cautious about attaching electronics directly to a 26-inch Weber Kettle, as those large-diameter grills can generate a massive amount of heat. However, the Billows BBQ Temperature Control Fan is specifically designed to handle these conditions if set up correctly.
You generally do not need to worry about heat damage, provided you follow these safety principles:- Integrated Heat Shield: The Billows includes a built-in heat shield behind the fan housing. This is designed to deflect radiant heat coming from the kettle wall, protecting the plastic electronics housing and the motor.
- Cool Air Flow: Because the fan is constantly pushing cool ambient air into the smoker, the internal components of the Billows stay significantly cooler than the grill surface itself.
- Spring-Loaded Mounting: The mounting clips are designed to create a slight gap or "stand-off" between the fan and the kettle, which helps minimize direct thermal conduction.
Comment
-
LegoMySearwood I was shocked at how strong the springs were on the Billows. I just leave mine attached to that universal adapter all the time, since both my charcoal cookers have the tube inlet that it pushes into. -
jfmorris and LegoMySearwood I have a similar adapter for my Assassin gravity feed. And putting the adapter on the Billows is a chore due to those springs. TW ran a sale on Billows a couple years ago that I could not pass up, and I bought a back up. So now I have a Billows dedicated to the GF because of the springs.
-
I've got the 26 fired up, its getting to temp now. I thawed some rib trim from a couple cooks when I made St Louis out of whole spares. I thought it would be a good cook to learn this Billows.
But I thawed too much, more than would fit on the 26. So I got the Assassin 17 fired up also, running it with the RFX. Been a while since I've run two smokers at once.
Attached FilesComment
-
Lynn, that is fine looking mess of meat. You are going to make some family and guests very happy! I use a Thermoworks RFX too. It has been flawless. I even use it for rotisseries cooks where the probes are subject to direct heat.
The RFX is expensive, but it is a very high-quality tool. No other cordless temp probe that I have seen works as good as the RFX. TW equipment is spendy but is reliable and works forever. I have a TW thermapen that is about 15 years old and is going strong. -
@briano ... that in the pic will make riblets. Wife and I will have dinner tonight and vac seal the rest. The pieces that went into the GF are really thin, like the skirt, etc
I love Thermoworks. All of my cooks are auto uploaded to the TW Cloud, where I will have graphs and I can make notes on each cook. Weber will have to make a great app to beat TW.
Once I the Kettle got to my set temp of 250, the Billows has kept it dialed in. I'm running 1/2 open at the damper, and 1/2 top vent.
-
-
I can improve on this, but I'm pretty happy with the Billows on the 26 . Once it reached the set temp it was humming. I was running out of coals at the end. Learning how many its gonna take.
Attached FilesComment
-
Lynn, I have never used the TW cloud. I should check it out. I too use a Vac Sealer. And all the time! I can buy in bulk and save. Wonderful for leftovers. Sometimes I just place the sealed bag in simmering water to reheat. Quick and the moisture is saved. A good Vac Sealer machine will pay for its cost in few months. I have a nice Weston Sealer. Love it. -
briano52 I use the cloud on my laptop to monitor the temps. It doesn't keep my phone tied up. Just a matter of clicking from tab to tab. And it has all my devices there, including my RFX probes.
-
-
Really happy with Billows on the 26. This was a smoke burger cook. It held a solid 225* until it started running out of coals. I lit 6 B&B briqs and a chunk of pecan, should've gone 8 or maybe even 10 .
Attached FilesComment
-
-
FWIW .....................
" Went to get a new grill today at Ace Hardware- price tag said $599, rang up as $299 "
https://www.reddit.com/r/BBQ/comments/1t34v9q/went_to_get_a_new_grill_today_at_ace_hardware/?utm_source=share&utm_medium=web3x&utm_name=web3xc ss&utm_term=1&utm_content=share_buttonComment
-
It appears Weber has fixed the issues with a firmware update. If ya don't wanna watch the entire thing, the creator says at the very end that is the case.
Comment


Comment