


I did finish the two boxes this weekend. So here's a rundown of features, and what I changed compared to the previous build.
* Just one door. Two doors was a fun idea, but definitely not needed. I like this cleaner look.
* Better door latch with bolts to limit the movement so the handle doesn't go full circle.
* A second charcoal grate 5" below the cooking grate. For serious searing :-) This charcoal grate is removable, just grab it with your hands and lift It out. I bought it from Amazon, it's a pretty sturdy cast iron grate.
* A small handle welded on the front edge of the grill grates, makes for very easy slide in and out. Plus, small "stops" that hold the grates in place when you slide it out, just like on an offset smoker. Super handy when you need to refill charcoal on the top grate, or just move the food out of the heat while fiddling with things etc.
* Shorter legs. The previous build had 300 millimeter/10" legs, this one only 200 mm/8". Much better.
* Swivel wheels all around. Make it very easy to move.
* Skipped the side handles (left+right). Wanted to get the build done, plus I like the slimmer look. We'll see if I need them in the near future, but I think this is good.
* The top door isn't flat anymore, this one "folds" over the front. Looks better, and is way better when handling food, as you don't have to reach over the sides and in, so to speak.
A feature I had on the previous one also is the fact that there's no lip/edge at the bottom of the main chamber where the door is. It should be trivially easy to scrape out ash without having to "lift" it over a low edge.
So, all in all I'm very happy with the build(s). I think my welding is way better now :-) It helps having built a ton of offset smokers. And I like the slightly more compact look 'n feel (width/height/depth of the actual box is the same).
Now I'm waiting for the paint to dry, will prolly fire it up next weekend, and shoot a video.
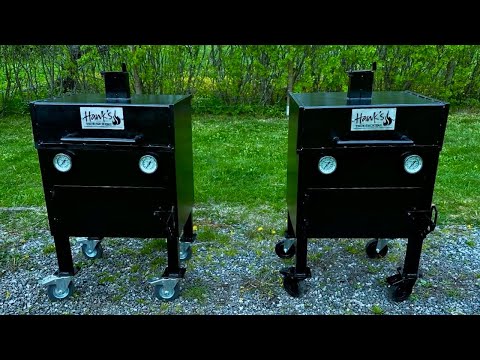
Twins?

Door open. Notice how easy it is to slide out the grates. Two Tel-Tru thermometers.

Grill grates slides out, upper (removable) charcoal grate visible.

Aerial view of top cast iron charcoal grate, and the "frame" it rests in.

Upper charcoal grate removed. This is how I will use it when cooking "Hill Country" style.

Close up of my offset smoker firebox latch and handle

Bottom charcoal area with fireproof bricks. Very snug fit.

I didn't paint the inside, don't want burnt paint to interact with my food. The top door is painted on the outside, I use Hammerite "straight to metal" smooth black. BUT: it is NOT heat resistant, so not sure how the top door will look after use. I guess I'll find out the hard way.
What do you think? Looks ok? Any features you miss? And no, I skipped on foldable side tables for now, wanted to get the build done. But I may very well add some soon, either bolt-on or something else. I need to search on Amazon if there are ready made foldable side tables so I don't have to fabricate. Any tips and suggestions is appreciated.
* Just one door. Two doors was a fun idea, but definitely not needed. I like this cleaner look.
* Better door latch with bolts to limit the movement so the handle doesn't go full circle.
* A second charcoal grate 5" below the cooking grate. For serious searing :-) This charcoal grate is removable, just grab it with your hands and lift It out. I bought it from Amazon, it's a pretty sturdy cast iron grate.
* A small handle welded on the front edge of the grill grates, makes for very easy slide in and out. Plus, small "stops" that hold the grates in place when you slide it out, just like on an offset smoker. Super handy when you need to refill charcoal on the top grate, or just move the food out of the heat while fiddling with things etc.
* Shorter legs. The previous build had 300 millimeter/10" legs, this one only 200 mm/8". Much better.
* Swivel wheels all around. Make it very easy to move.
* Skipped the side handles (left+right). Wanted to get the build done, plus I like the slimmer look. We'll see if I need them in the near future, but I think this is good.
* The top door isn't flat anymore, this one "folds" over the front. Looks better, and is way better when handling food, as you don't have to reach over the sides and in, so to speak.
A feature I had on the previous one also is the fact that there's no lip/edge at the bottom of the main chamber where the door is. It should be trivially easy to scrape out ash without having to "lift" it over a low edge.
So, all in all I'm very happy with the build(s). I think my welding is way better now :-) It helps having built a ton of offset smokers. And I like the slightly more compact look 'n feel (width/height/depth of the actual box is the same).
Now I'm waiting for the paint to dry, will prolly fire it up next weekend, and shoot a video.
Twins?
Door open. Notice how easy it is to slide out the grates. Two Tel-Tru thermometers.
Grill grates slides out, upper (removable) charcoal grate visible.
Aerial view of top cast iron charcoal grate, and the "frame" it rests in.
Upper charcoal grate removed. This is how I will use it when cooking "Hill Country" style.
Close up of my offset smoker firebox latch and handle
Bottom charcoal area with fireproof bricks. Very snug fit.
I didn't paint the inside, don't want burnt paint to interact with my food. The top door is painted on the outside, I use Hammerite "straight to metal" smooth black. BUT: it is NOT heat resistant, so not sure how the top door will look after use. I guess I'll find out the hard way.
What do you think? Looks ok? Any features you miss? And no, I skipped on foldable side tables for now, wanted to get the build done. But I may very well add some soon, either bolt-on or something else. I need to search on Amazon if there are ready made foldable side tables so I don't have to fabricate. Any tips and suggestions is appreciated.


Comment