Instagram AmazingRibs Facebook AmazingRibs X - Meathead Pinterest AmazingRibs Youtube AmazingRibs

Welcome!


This is a membership forum. Guests can view 5 pages for free. To participate, please join.

[ Pitmaster Club Information | Join Now | 30 Day Trial | Login | Contact Us ]

Only 4 free page views remaining.

Announcement

Collapse
No announcement yet.

New smoker build. 250 gallon on a yard cart.

Collapse
X
 
  • Filter
  • Time
  • Show
Clear All
new posts

    #16
    Oh yeah, the walkaround video...

    Comment


    • PGH_RAM
      PGH_RAM commented
      Editing a comment
      That's turning out to be a real beaut!

    • Sweaty Paul
      Sweaty Paul commented
      Editing a comment
      Badass!

    #17
    That thing is so cool!

    And them yard birds be running…..they know that’s a winner winner chicken, brisket and pork dinner coming!

    Comment


      #18
      Spending my whole afternoon grinding off s****y welds.

      Cant imagine what I was thinking, starting to think I was beginning to improve.

      Comment


      • PGH_RAM
        PGH_RAM commented
        Editing a comment
        You're going to nail it. Give yourself some grace and time.

      • DogFaced PonySoldier
        DogFaced PonySoldier commented
        Editing a comment
        Go figure... I decided to do an overhead horizontal, turned out pretty good, almost no drips. I cant figure it. Lol

      #19
      Alright...update time, I suppose. Stack isn't welded, just test-fitted - 2nd attempt, screwed up the fit on the firdt one. Luckily I have extra pipe laying around. That one'll get used for something else later.

      Needs door trim, racks and a side shelf. Have an interesting idea for that, I don't want something big, square and obzucki sticking out and ruining the 'lines' of the aesthetic.

      I'm thinking of calling her the "Mark 48."

      Click image for larger version

Name:	20240428_152102.jpg
Views:	428
Size:	211.0 KB
ID:	1590840 Click image for larger version

Name:	20240428_152117.jpg
Views:	453
Size:	196.5 KB
ID:	1590841 Click image for larger version

Name:	20240428_152139.jpg
Views:	418
Size:	212.3 KB
ID:	1590842 Click image for larger version

Name:	20240428_152145(0).jpg
Views:	408
Size:	231.7 KB
ID:	1590844 Click image for larger version

Name:	20240428_152153.jpg
Views:	415
Size:	226.5 KB
ID:	1590843 Click image for larger version

Name:	20240428_152129.jpg
Views:	423
Size:	174.7 KB
ID:	1590839

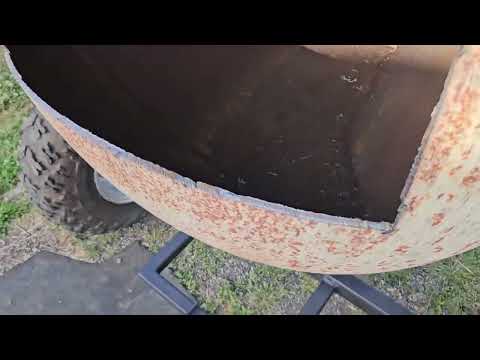
      I really love the patina on this tank. I think I'm going to go with a linseed oil finish.

      Comment


      • Sweaty Paul
        Sweaty Paul commented
        Editing a comment
        Very badass!

      • DogFaced PonySoldier
        DogFaced PonySoldier commented
        Editing a comment
        She's a little heavy, I'm not gonna lie. On that rough ground I pull her around on, into and out of the shop, etc., it can be a little rough, but I can do it. About like my 80-gallon with the insulated firebox and heavy cart, etc. That sucker is heavy. I AM a little concerned once I get the shelving and such in that it's going to be over-heavy. On concrete or smooth flat ground it won't be a bit of a problem - in the semi-rough terrain I pull over every day, I gotta lean into it fer sure.

      • DogFaced PonySoldier
        DogFaced PonySoldier commented
        Editing a comment
        I'm trying to think of some kind of 'adapter' I can put on the pull handle to allow someone to pull it with a small tractor or ATV, that would be ideal.

      #20
      Got work done today... Door trim applied and lower cooking grates built and installed!

      Click image for larger version

Name:	20240429_190730.jpg
Views:	405
Size:	247.4 KB
ID:	1591465 Click image for larger version

Name:	20240429_190726.jpg
Views:	391
Size:	256.7 KB
ID:	1591467 Click image for larger version

Name:	20240429_190721.jpg
Views:	390
Size:	253.8 KB
ID:	1591466 Click image for larger version

Name:	20240429_190703.jpg
Views:	391
Size:	237.8 KB
ID:	1591464 Click image for larger version

Name:	20240429_190657.jpg
Views:	419
Size:	232.6 KB
ID:	1591463

      Tomorrow will be upper slide-out racks, drain, door handles, weld on exhaust stack and decide if I want inner or outer firebox door trim. Oh and side shelf. Ok, maybe 2 more days of work, that's a bit and I have a meeting to go in for at work at noon.

      ​​​​​​​So we'll see how much I get done.

      Comment


        #21
        On the door trim, I didnt want to grind off all the paint at the trim line, as I'm trying to preserve the patina as much as possible... So I meticulously mapped it all out and plotted all my spot welds, used a grinder with a cutoff wheel to very very carefully grind the paint off ONLY where the spot welds would be. Dont want to try to weld through paint and rust, I wanted those spot welds to melt in well and really adhere - I had that problem with my previous build and my door trim popped off because the spot welds didnt really bond when welding through paint.

        Some pics:

        Click image for larger version

Name:	20240429_110353.jpg
Views:	383
Size:	232.0 KB
ID:	1591470 Click image for larger version

Name:	20240429_110352.jpg
Views:	382
Size:	253.4 KB
ID:	1591471 Click image for larger version

Name:	20240429_110340.jpg
Views:	376
Size:	261.5 KB
ID:	1591472 Click image for larger version

Name:	20240429_110349.jpg
Views:	371
Size:	260.8 KB
ID:	1591473 Click image for larger version

Name:	20240429_110348.jpg
Views:	379
Size:	252.7 KB
ID:	1591474

        Comment


        • Greygoose
          Greygoose commented
          Editing a comment
          Clean welds are happy welds

        • Jerod Broussard
          Jerod Broussard commented
          Editing a comment
          Ok, I'm looking at that and wondering where the darn clamp goes!!

        • DogFaced PonySoldier
          DogFaced PonySoldier commented
          Editing a comment
          Ha! Well, the 1.5" flat bar overlaps halfway onto the door, so there's 3/4" on the backside for the clamp to get purchase.

        #22
        Ok, pretty well finished her up today....

        Lining up the rails for the upper racks.

        Click image for larger version  Name:	image.png Views:	0 Size:	7.98 MB ID:	1592250
        Didn't seem to actually take pics of the upper racks - but you can see them in the video below.

        Some final outside shots:

        Click image for larger version  Name:	image.png Views:	0 Size:	8.80 MB ID:	1592251
        Click image for larger version  Name:	image.png Views:	0 Size:	8.18 MB ID:	1592252
        Click image for larger version  Name:	image.png Views:	0 Size:	8.07 MB ID:	1592253
        Click image for larger version  Name:	image.png Views:	0 Size:	10.03 MB ID:	1592254
        Click image for larger version  Name:	image.png Views:	0 Size:	10.88 MB ID:	1592255
        Click image for larger version  Name:	image.png Views:	0 Size:	9.49 MB ID:	1592256
        And the final badging:

        Click image for larger version  Name:	image.png Views:	0 Size:	6.82 MB ID:	1592257
        Some of you might have noticed - no side shelf. Honestly, I was going to start it, and I just decided I didn't want one. I like the long, sleek look of her as she is - hence the moniker, the "Mk48".

        I probably still oughtta add some thermometers and some 'keepers' on the upper shelves. Maybe tomorrow. But overall, she's totally functional now and ready to rock and roll. Baby's got her dancin' shoes on!

        So, yeah, after I do those things, then time to fire her up and oil her down.

        W00T!

        Thanks for coming along for the ride, I hope it was fun - it was certainly exhausting these last few days, I've put probably 40 hours in her in the last 5 days or so. I'm not the fastest worker, and I have to redo some things at times, since I'm a novice and still learning as I go and keep making small mistakes. Oh well, that's what this is all about, building, learning, starting to get the hang of some things...

        Today I lost my temper for the first time and one of my top shelf racks went flying out the shop door about 15 feet onto the ground... but, it wasn't so much as dented, much less any welds break, so I guess that's a testament to the build strength anyways, if not the overall 'build quality'. lol

        I'm proud of her, for what she is. Had one guy in Miami, FL already say whenever I'm ready, he'll pay freight down there - but then, you know, when it's time to pony up, big mouths get suddenly smaller.

        <edit> Forgot to add the video. lol


        Well... there it is.


        Click image for larger version  Name:	There it is.gif Views:	0 Size:	2.96 MB ID:	1592258

        Comment


        • Uncle Bob
          Uncle Bob commented
          Editing a comment
          LOL, that thing about yakin' it up before it's time to step up with the Benjamins is sadly common across many endeavors. I can't tell you how many guys have said to me something like; "when you get ready to sell that hot rod of yours let me know, I'll take it right away." Then amnesia sets in........................

        • barelfly
          barelfly commented
          Editing a comment
          That thing is so freaking cool! Have really enjoyed the builds you’ve done this past year! Thank you for sharing them with us here.

        • Jerod Broussard
          Jerod Broussard commented
          Editing a comment
          No water in that thing but yet you somehow managed to get sharks with laser beams on their heads? Amazing!

        #23
        That is a beautiful thing

        Comment


          #24
          Dang if that thing doesn’t look like a locomotive! 👍

          Comment


            #25
            Thermometers in place today.

            Click image for larger version

Name:	image.png
Views:	311
Size:	994.7 KB
ID:	1592669

            Top shelf finally completed, got angle iron brackets in there to hold 'em down and let 'em slide out and be secure. LOT OF grinding today, had to grind down 2 sides of each top shelf to fit well under the brackets, and also grinding to clean up all 5 shelves. I wuz durrty. Wife said when I got home I was in "blackface" - luckily no pics to haunt my political career later in life. lol. Yeah... like I don't have enough OTHER history to derail any campaign, even for dogcatcher! Oh yeah... pics of top shelves!

            Click image for larger version

Name:	image.png
Views:	288
Size:	1.01 MB
ID:	1592670
            Click image for larger version

Name:	image.png
Views:	292
Size:	987.1 KB
ID:	1592671
            Click image for larger version

Name:	image.png
Views:	319
Size:	903.2 KB
ID:	1592672
            Click image for larger version

Name:	image.png
Views:	294
Size:	903.2 KB
ID:	1592673

            Next she's just ready to build a fire, measure temps and bake on the linseed oil finish!


            Comment


            • Uncle Bob
              Uncle Bob commented
              Editing a comment
              It is genuinely fun watching your growth with each project completion...........

            • Skip
              Skip commented
              Editing a comment
              Looks great!

            • Jfrosty27
              Jfrosty27 commented
              Editing a comment
              Flame on Pitmaster!!! Totally cool. 😎

            #26
            Thanks for sharing. You are very creative and these are great!

            Comment


              #27
              Can't wait to see that cooker running!

              Comment


                #28
                First burnout today. Fired up the pit, applied BLO (boiled linseed oil), ran her for a few hours, cranked up the temps, evaluated evenness of grate-level temps, etc.

                Some before/after picture comparisons.

                Click image for larger version

Name:	image.png
Views:	318
Size:	1,022.1 KB
ID:	1593117
                Click image for larger version

Name:	image.png
Views:	273
Size:	942.5 KB
ID:	1593118
                Click image for larger version

Name:	image.png
Views:	262
Size:	1,005.3 KB
ID:	1593119
                Click image for larger version

Name:	image.png
Views:	301
Size:	1.10 MB
ID:	1593120

                Click image for larger version

Name:	image.png
Views:	264
Size:	1.07 MB
ID:	1593121
                Click image for larger version

Name:	image.png
Views:	260
Size:	1.08 MB
ID:	1593122

                Click image for larger version

Name:	image.png
Views:	261
Size:	1,012.9 KB
ID:	1593123
                Click image for larger version

Name:	image.png
Views:	254
Size:	993.0 KB
ID:	1593124

                Click image for larger version

Name:	image.png
Views:	261
Size:	942.2 KB
ID:	1593125
                Click image for larger version

Name:	image.png
Views:	258
Size:	895.9 KB
ID:	1593126

                I very much like the improvement, though it's not a total transformation - she seems to have a lot more 'character' to me now.

                Temps... I was pretty happy.

                Click image for larger version

Name:	image.png
Views:	250
Size:	103.8 KB
ID:	1593127
                Click image for larger version

Name:	image.png
Views:	247
Size:	105.5 KB
ID:	1593128

                My little firebox vertical baffle/scoop thing seems to have done a pretty good job. Top rack definitely gets quite hot, and pushes 600ºF and above when rip-roaring (probes stop registering above around 570ºF or so), but when letting her coast gently along, she seems to really like the 240-250ºF range and she absolutely SIPS fuel compared to Big Bertha, my 320-gallon. I've always known Bertha was a thirsty gurl, but damn, I could run this thing all DAY on HALF of what Bertha uses. Or more probably less.

                Anyways, experiment seems to be successful.

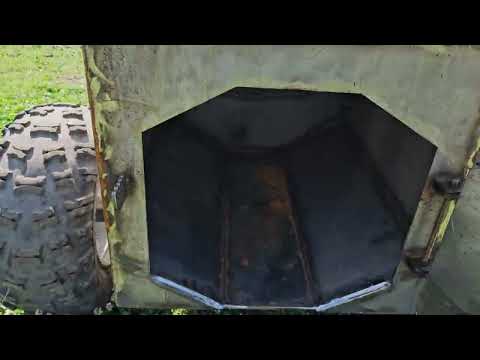
                Although... tires got too hot. Around 200-220ºF at the top edges of the tires when really burning all out for a couple of hours. <sigh> So, I'm gonna have to find a way to get some fenders that'll fit over this big 25" tires and fab those on to add a heat shield between the firebox and the tops of the tires. Lower half, irrelevant - the air gap on the bottom angled sides of the firebox reduces the radiant heat an incredible amount. Honestly, if I'd made the firebox floor 45º angled up instead of 30º, it would have come up prolly 3" higher and it wouldn't have been an issue.

                But, I think she'll look pretty decent with some fenders, anyways. Just a setback, just another hundred bucks or two and a day's work and she'll be ready to put on the auction block! lol

                Man, she runs GOOD, though! Errr... well. Runs WELL. Or something.


                I'm almost tempted to keep her... the divorce would cost me a shiteload, though!

                Cheers!

                Comment


                  #29
                  Thanks for bringing us along for the ride on this build. It’s always fun seeing what the talented folks here are able to accomplish.

                  Comment


                    #30
                    Maybe incorporate a shelf into the fenders??

                    Man, that cooker looks great!!

                    Comment

                    Announcement

                    Collapse
                    No announcement yet.
                    Working...
                    X
                    false
                    0
                    Guest
                    Guest
                    500
                    ["membership","help","nojs","maintenance","shop","reset-password","authaau-alpha","ebooklogin-start","alpha","start"]
                    false
                    false
                    Yes
                    ["\/forum\/free-deep-dive-guide-ebook-downloads","\/forum\/free-deep-dive-guide-ebook-downloads\/1157845-paid-members-download-your-6-deep-dive-guide-ebooks-for-free-here","\/forum\/the-pitcast","\/forum\/national-barbecue-news-magazine","\/forum\/national-barbecue-news-magazine\/national-barbecue-news-magazine-aa","\/forum\/national-barbecue-news-magazine\/national-barbecue-news-magazine-aa\/bbq-news-magazine-2019-issues","\/forum\/national-barbecue-news-magazine\/national-barbecue-news-magazine-aa\/bbq-news-magazine-2020-issues","\/forum\/national-barbecue-news-magazine\/national-barbecue-news-magazine-aa\/bbq-news-magazine-2021-issues","\/forum\/national-barbecue-news-magazine\/national-barbecue-news-magazine-aa\/bbq-news-magazine-2022-issues","\/forum\/national-barbecue-news-magazine\/national-barbecue-news-magazine-aa\/current-2023-issues","\/forum\/national-barbecue-news-magazine\/national-barbecue-news-magazine-aa\/current-2024-issues","\/forum\/national-barbecue-news-magazine\/national-barbecue-news-magazine-aa\/current-2025-issues","\/forum\/bbq-stars","\/forum\/bbq-stars\/tuffy-stone","\/forum\/bbq-stars\/meathead","\/forum\/bbq-stars\/harry-soo","\/forum\/bbq-stars\/matt-pittman","\/forum\/bbq-stars\/kent-rollins","\/forum\/bbq-stars\/dean-fearing","\/forum\/bbq-stars\/tim-grandinetti","\/forum\/bbq-stars\/kent-phillips-brett-gallaway","\/forum\/bbq-stars\/david-bouska","\/forum\/bbq-stars\/ariane-daguin","\/forum\/bbq-stars\/jack-arnold","\/forum\/free-deep-dive-guide-ebook-downloads"]
                    /forum/free-deep-dive-guide-ebook-downloads