Welcome!


This is a membership forum. Guests can view 5 pages for free. To participate, please join.

[ Pitmaster Club Information | Join Now | Login | Contact Us ]

Only 4 free page views remaining.

Announcement

Collapse
No announcement yet.

Dialing In Pit Barrel Temperature & Different Meats

Collapse
X
 
  • Filter
  • Time
  • Show
Clear All
new posts

    Dialing In Pit Barrel Temperature & Different Meats

    PitBoss David was kind enough to read a response I gave to someone on the freebie side of the house last night, and suggested I share this in The Pit. Honestly, I'm not sure it's in the same league as Kathryn's excellent treatise, but I'll share it anyway.

    A reader asked: "Why did you cook your baby back ribs at 220 degrees...60 degrees lower than the designed temperature of the PBC?" My reply below:
    Paul, fasten your seatbelt...this won't be brief. (But I promise to answer your questions further below.)
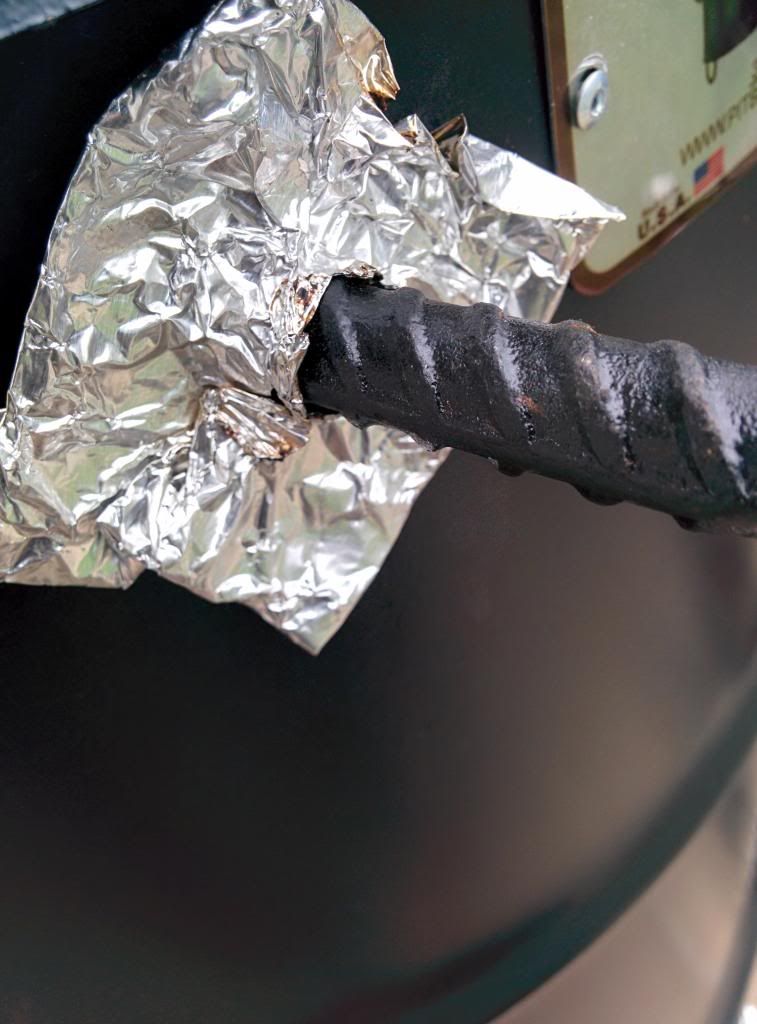
    I'm learning a TON about temperature management with the PBC. If you follow instructions and let it run itself, it will run at about 260-270 degrees (with rods in). In my experience, the air intake (bottom vent) makes next-to-no difference. I've taken it from 1/8 open to 3/4 open and watched the temperature climb merely 15-20 degrees. On the contrary, outflow is makes all the difference in temperature. Cram aluminum foil in 2 hanging rod holes? Watch it drop from 270 to 235 degrees. Close off one more "rod hole", and you'll see it drop to 210-215.
    Orrrr...lift the lid and stick a single matchstick in the gap to prop the lid open a small amount (with rod holes open) and you'll see the temperature climb to 290. Cram crumpled aluminum foil or a wood chip to create a 1/2 inch gap in the lid and it will jump to 330 degrees. Slide the lid back so it reveals a 1.5-2 inch opening at the top and your temp can climb to 410 degrees.
    OK, so why does that matter??
    Chicken comes out with a much more enjoyable crispy skin yet a juicy tender meat when cooked at about 310 degrees.
    Beef needs a much slower, longer time on heat to break down collagens and fibers binding muscle together and that simply takes time. I've found 220-250 is best for that.
    I'm starting to appreciate the pork may be the trickiest meat to get right, but it is also extremely rewarding.
    Pork ribs are thin and delicate. They simply can't take (high) heat very long. So you have to be careful not to overheat them. Yet, their muscle fiber benefits from slowly rendering the binding fat. On the other hand, a pork shoulder isn't what you'd call "delicate". It's a beast. But it's also well marbled and benefits from having the fat melt from within. That requires time. If you cook it too hot, it will scorch on the outside yet not render fat on the inside, thus remain tough.
    So yes, for me cooking baby back ribs at 220-230 is just about right. It gives them enough heat to render the slivers of fat but enough time to do that work where it doesn't over cook the meat. It has time to soften.
    Yes, I get a fantastic bark. I pulled the ribs with a very crispy bark, applied a good coat of sauce and then hung them for another 30 minutes to finish. After that, wrapped them to rest for 30 minutes. I believe in double wrapping with HEAVY foil...not the cheap thin stuff. Even with sauce (sacrilegious to some), it still retains a lovely, crispy exterior...but the interior is dripping with moisture. (see photo) It takes just a gentle tug of the teeth to get the meat off the bone...it meat doesn't fall off prematurely.
    Yes, I used wood...hickory. 3 chips about the size of zippo lighters...maybe one a double thick zippo.
    Hope this helps. If not, blame the whiskey.

    Click image for larger version

Name:	Ribs1.jpg
Views:	349
Size:	99.8 KB
ID:	58013Click image for larger version

Name:	FullSizeRender.jpg
Views:	351
Size:	63.4 KB
ID:	58014
    Click image for larger version

Name:	IMG_7982.JPG
Views:	345
Size:	95.6 KB
ID:	58015

    #2
    Fantastic info. I used the foil trick back when I did AR bacon. So I confirm what you stated. I did bacon at a steady 200-215 for about 2 hours.

    Comment


    • ATXBill
      ATXBill commented
      Editing a comment
      Yeah, my wife has been getting on me about all the aluminum foil shrapnel on the back deck. She swears the dog is going to eat 'em and give himself a colonectomy.

    #3
    Looks great and great info, I cook my spares at the normal temp and they are good, but the baby backs I get seem to have a lot more fat in them, I will have to try cooking them at a lower temp to see if that solves it. When I first started learning this thing I cooked 4-5 racks a week for a few months and got burnt out, I haven't had any in a couple months so now is probably a good time to try it!

    Comment


    • ATXBill
      ATXBill commented
      Editing a comment
      Would love to hear how your research goes and if you see any difference.

    #4
    Nice write up. To the point, I like that. I would agree with you, manipulation of the top half of the PBC is most influential to temps. I do notice a change when I move the bottom damper but it is minimal. However, as you said, crack the lid and the temp jump up rather quickly.

    I have modified my PBC, against Noah and many others advice. (Except for the PBC Brisket Oracle Jerod Brussard and a few others.) I put 3/4 inch stacks on mine with ball valves to open and close the stacks. It really helps with air flow and allows me to get through those really long cooks when she's loaded down with brisket of Pork butts. It works much like the lid crack method. As soon as I crack those stacks open, the temp pops up and air flow really increases. I always do my ribs hot and fast on the PBC. Next time I am going to try to slow her down and go to yours and MH's suggested 220 F. Nice post man. Good info.
    Click image for larger version

Name:	IMG_2849.jpg
Views:	353
Size:	83.0 KB
ID:	58055

    Comment


    • Spinaker
      Spinaker commented
      Editing a comment
      @ Guy, You can't see it in the Photo but I have two cinder blocks stacked up right behind the PBC. Between the cabin and PBC. The photo is a bit deciving, its probably about a foot and a half from the siding.

    • ATXBill
      ATXBill commented
      Editing a comment
      So I've been tempted to mod my PBC. One thought I had was to focus on the lid...so if I hacked it badly I could always by a spare / replacement lid. Curious if you considered that and what led you to dual stovepipes? I'm also curious about details on the ball valves...those handles look like they have great attenuation.

    • Guy
      Guy commented
      Editing a comment
      OK just be careful. I have repaired a bunch of burned houses for insurance companies. A lot of them were from heating devices malfunctioning or being too close to combustible materials. You can keep a check just my testing the wall with your hand.

    #5
    Welcome Bill! Great info, Great Pictures, Great post!

    I'd also like to thank all of the other members above who've shown you a friendly welcome. Brings a little tear actually... I need a moment.

    Comment


    • Guy
      Guy commented
      Editing a comment
      Too funny Boss

    #6
    This was a great post Bill really enjoyed it.

    Comment


      #7
      @Timkatt Here is a close up of the connection from the stack to the barrel. Mine Is welded into place. Probably not what you are looking for. I know that Jerod (Moderator) has pipes on his and he used fittings to connect his stacks to the barrel. If its possible to weld them on do it. Its air tight and you don't have to fiddle with JB weld or some other sealant. If you can do it, its a fun project . There is a thread bouncing around here somewhere that we all put together when we were doing these projects. Here are the link to those discussions.

      http://pitmaster.amazingribs.com/for...ked-gracias-hc
      http://pitmaster.amazingribs.com/for...ing-pbc-stacks

      I hope this helps!!

      Click image for larger version

Name:	IMG_2925.jpg
Views:	354
Size:	65.3 KB
ID:	58126
      Attached Files
      Last edited by Spinaker; January 29, 2015, 03:45 PM.

      Comment


      • ATXBill
        ATXBill commented
        Editing a comment
        Gotta respect someone with the courage to bastardize a perfectly good cooker and make it better. Nicely done. Got any design spec's or instructions? I'm feeling a project coming on...

      #8
      Bill, thank you for the great writeup and all of the helpful information. I've used about every tip you've given for one cook or another to get the temperature that I'm looking for for each one. It's almost second nature now, but even so it's nice to have all of that wonderful info in one place. You've done us PBCers a great service!

      Sometimes I wonder, though, what would happen if I just did a "set and forget" cook. The only time I did one of those was for my very first cook when I followed Noah's instructions to the letter. The chickens tasted great but took over 2 hours to cook because the ave PBC temp was about 215 deg F. Then I changed up the lighting procedure to ensure a good initial coal burn. For each cook after that (a lot of them by now) I keep an eye on the temp and adjust accordingly as you have described. I don't think I'll ever feel comfortable with setting/forgetting, so it probably won't happen. For me the only way to have a measure of control on how the cook turns out is to keep an eye on that PBC.

      Kathryn

      Comment


      • fzxdoc
        fzxdoc commented
        Editing a comment
        Good point, Strat.

      • Ernest
        Ernest commented
        Editing a comment
        HAHAHAHAHA Strat50!!

      • Guy
        Guy commented
        Editing a comment
        I agree. I cook because I like the work (if you can call it work). I don't want to set it and forget it.

      #9
      Echoing Pit Boss Dave's message...thank you all for the friendly welcome to The Pit. Now I can prove to my wife that there are other kind, smokey-smelling weirdo's like me making people happy one carnivorous bite at a time.

      Cheers...


      Comment


      • smarkley
        smarkley commented
        Editing a comment
        Heh heh you must be a member of PETA, also! (People Eating Tasty Animals)

      #10
      Great write up Bill! I started reading your post about the different things you do/have done to adjust the temp for different types of meat, and as I am reading I think to myself yep done that, and that, that too.... It's really great how each of us can look at a challenge/problem and come up with these little or sometimes major fixes to dial in our PBC's. Sometimes doing the same thing, like wedging little pieces of foil around the rods, or propping open the lid.

      Thanks for sharing!

      Nick

      Comment


        #11
        Good info. Bill. Looks like you get a nice product! Just out of curiosity, did you not like the way the ribs turned out a la Noah's method? I wrote him with this question about high internal temps a long time ago and he advised me not to worry too much about chasing conventional BBQ temps b/c the PBC cooks meat a little differently than does a traditional smoker. Others have explained that the higher ambient temps aren't a factor because the hanging method ensures that very little surface area is exposed to the direct heat and the juices run down the sides, cooling the rib's exterior. I don't know if all of that is true, but the PBC sure makes some tasty ribs!!! I'd love to try your approach.

        Comment


        • ATXBill
          ATXBill commented
          Editing a comment
          'Chop, the ribs coming out of Noah's recommendation were good. Solid 'B' ribs. The PBC is so reliable for "set and forget" But following Noah's instructions resulted in an odd combination of firm meat, yet gelatinous fat. My perception (could be wrong) is that they cooked too fast. Because the heat was higher (and directly under the ribs), the dense meat cooked quickly and got tough but the fat didn't have time to render. Lower the temperature and the meat cooks far more slowly. But more importantly the fat has ample time to render...to "sweat" into moisture for the meat rather than remain intact.

          I do believe that the PBC produces a good amount of humidity. But I struggle to believe it lowers the temperature. I think the design of the PBC constricts air outflow, and that constricts temperature.

          This will sound like sacrilege, but the notion that the "hanging method ensures very little surface area is exposed to direct heat" is a bit of a fallacy. Don't stone me...I'm not a hater. I love the PBC. But simply hanging the meat vs. laying it flat doesn't inherently protect it. Arguably, it may move it closer to heat. (Hang a full rack of ribs and the bottom is 2 inches from the heat. Compare that with an offset heat smoker: the heat is 2-4 feet away.)

          A way to think of this is that the PBC finds a midpoint or sweet-spot between the lows and the highs of barbecue. It likes to run between 260-280 without touch. And generally that's great. But certain meats optimize at 220-240, and others optimize at 280-320. You just have to choose whether the average is good enough or if you want to be specific.

          My auto-pilot ribs on the PBC are totally enjoyable. It's like getting in a sailboat, selecting a compass heading, and simply being glad to be on the water, even if the sails flutter. If wind fluctuations result in boat performance fluctuations, you're OK with that. You are sailing.

          But there are times on the water when you want to maximize performance. On those days you are tuning the jib and main...adjusting your angle of attack on the wind...to get the most out of the experience. It's just as enjoyable...but a different experience.

          The PBC will allow you to enjoy both sails...

        • Beefchop
          Beefchop commented
          Editing a comment
          Sounds good. I'm just regurgitating what the good AR Science Advisor Dr. Blonder has written here on the PBC and its design. Any mistakes conveying the science of the hanging meat as he explains it in the review are my own, of course.

          I've personally never found the PBC to be amenable to (or in need of) tinkering, which is probably why I've been looking at more "hands on" smoker designs lately. It just works too darn good out of the box!

        #12
        @ATXBill,
        True you could always buy a new lid, but I would do everything in my power to prevent that. I didn't want to mess with the lid. With paint being on the rim of lid and the grease from a few cooks had made the lid fit very tight and I didn't want to lose that advantage with a new lid. That is why I went with the stacks on mine. Plus Jerod and a few other tinkerers had done the same with slightly different mods. So I had something to work from.
        The ball valves are a great addition, I can control the airflow very precisely, which is what I really wanted. When they are closed, no air/smoke what so ever gets through the valve, which is key to temp control, as you know. When I need extra airflow I can adjust according to weather, what kind of meat I am cooking, how much I'm cooking, etc. There is nothing special about the valves I bought. I got them at Home Depot. I was a bit worried that the valves would get too hot and melt the gasket inside, but that hasn't happened and I don't think it will. By the time the air/smoke hits the valve area, it has cooled enough that it doesn't cause any problems. (I'm sure if you used it as a burn barrel then it might, but with normal PBC temps you shouldn't have any issues.) There is a discussion on here while we were modifying our PBCs. I put it below. There are a few different designs on the thread. I hope this helps!!

        http://pitmaster.amazingribs.com/for...ing-pbc-stacks

        Comment


        • ATXBill
          ATXBill commented
          Editing a comment
          You are a good man. Thanks for sharing your thoughts on this. I have much to learn and many meals to experiment with. I'll measure 5x before cutting my PBC. :-)

        • Spinaker
          Spinaker commented
          Editing a comment
          Good call Bill. My father always said "measure twice, cut once."

        #13
        I mentioned I wanted to try this and I am, the ribs are on now. It snowed Wednesday so of course it is 72 today, partially plugged 2 holes and we have been very steady at 218-225. Not sure how much extra time it will take, but I planned for 6 hours. Now I can hit pretty much any temp I want on this thing.

        I'll let you know how the ribs turn out.

        So they are finally done, though it took 8 hours to get to the proper tenderness. My wife said they were my best yet, she is really opposed to fat, but to me they were a touch too dry and the outside got a little too tough. I think this method has merits, but for me personally I think I will wrap for at least an hour in there somewhere. I'm used to 3.5 hour ribs.
        Last edited by _John_; February 7, 2015, 08:39 PM. Reason: They're done

        Comment


        • ATXBill
          ATXBill commented
          Editing a comment
          Wow, 8 hours is a long time. For my run, I was at 5 hours 45 minutes, and then 30 minutes of wrapping. They were the juiciest ribs I've ever had, but no visible fat...and the bark was perfect.

        #14
        Bill between your and Kathryn's articles, I think we now have a course entitled PBC-101! Jerod's mods and write ups not withstanding, which I would consider the advanced tutorial on PBC and brisket. All of these articles are helping me a ton with the PBC. I am getting ready to print everything out and have a handy manual nearby since my "some-timers" is quickly turning into "all the timers". Many thanks to all for these articles.

        Comment

        Announcement

        Collapse
        No announcement yet.
        Working...
        X
        false
        0
        Guest
        Guest
        500
        ["pitmaster-my-membership","login","join-pitmaster","lostpw","reset-password","special-offers","help","nojs","meat-ups","gifts","authaau-alpha","ebooklogin-start","alpha","start"]
        false
        false
        {"count":0,"link":"/forum/announcements/","debug":""}
        Yes
        ["\/forum\/free-deep-dive-guide-ebook-downloads","\/forum\/free-deep-dive-guide-ebook-downloads\/1157845-paid-members-download-your-6-deep-dive-guide-ebooks-for-free-here","\/forum\/the-pitcast","\/forum\/national-barbecue-news-magazine","\/forum\/national-barbecue-news-magazine\/national-barbecue-news-magazine-aa","\/forum\/national-barbecue-news-magazine\/national-barbecue-news-magazine-aa\/bbq-news-magazine-2019-issues","\/forum\/national-barbecue-news-magazine\/national-barbecue-news-magazine-aa\/bbq-news-magazine-2020-issues","\/forum\/national-barbecue-news-magazine\/national-barbecue-news-magazine-aa\/bbq-news-magazine-2021-issues","\/forum\/national-barbecue-news-magazine\/national-barbecue-news-magazine-aa\/bbq-news-magazine-2022-issues","\/forum\/national-barbecue-news-magazine\/national-barbecue-news-magazine-aa\/current-2023-issues","\/forum\/national-barbecue-news-magazine\/national-barbecue-news-magazine-aa\/current-2024-issues","\/forum\/free-deep-dive-guide-ebook-downloads\/1165909-trial-members-download-your-free-deep-dive-guide-ebook-here"]
        /forum/free-deep-dive-guide-ebook-downloads/1165909-trial-members-download-your-free-deep-dive-guide-ebook-here