
Sometimes, in the final stretch and folds, my dough is so airy, I feel like I only need 3 S&F to round it out (not 4). Should I force in one extra S&F after my third one?
-
-
Here's a question for you artisan loaf bakers out there. I received a bread cloche (made of unglazed clay pottery) for Xmas and I'm wondering if anyone here has used one. I haven't tried it yet mainly because I'm finding conflicting advice around the interwebs:- Start the oven no hotter than 275-300 deg. F. then turn it up to your desired temp after putting the boule and cloche lid in place. Apparently putting a cold boule on the base might crack it due to thermal shock.
- Start the cloche and oven both cold, then let them come up to temp slowly (huh?).
- Never exceed 450 deg. F. This is a show stopper if true because I normally bake at 475 or 500.
- Never set a hot cloche on the cool counter because (again) thermal shock might crack it.
- Coat the interior lightly with oil after every cook in order to form a patina.
- Never soak it in water or spritz it ... again due to it falling to pieces in the hot oven.
- Never wash it while it's hot ... thermal shock again. Duh!
- Leave the lid on for the entire cook (I don't think so).
- Bake for 30 minutes covered then remove the lid (just don't set the hot lid on the counter).
Comment
-
Seems like a bit of a loser there. Should have nice thermal mass and heat retention properties, but that level of instruction seems a loser for me. I like the throw it over the fence nature of cast iron. -
In defense of La Cloche:
I think you'll be fine preheating it, and dropping a room-ish temp loaf in. -
Thanks, Potkettleblack. Since (like you) I prefer cast iron, I think I'll just give La Cloche a try using my favorite temps. If it breaks, I've still got my cast iron favorites.
-
My wife used to make no-knead bread in a ceramic cloche (we called it the clay baking thing--LOL). She pre-heated to 500°F--from room temp. I suspect heating in a cold (to start) oven and not soaking it in water is good advice. Various "brands" may require different usage.Personally, I like @Breadhead's idea of a pizza stone and stainless steel bowl.Comment
-
I have had this clay baker for a number of years - long enough that I don't remember if I did anything to season it when I got it. It does look like I may have spread a little oil in the bottom though. At any rate, I put it in a cold oven and then turn the oven on to whatever temp I need. I then place the risen dough in the hot baker and put the lid on with no problems.
To make it easier to get the dough in the hot bottom half, I place the shaped dough on a narrow piece of parchment, lift the parchment, and place carefully in the baker. You can then either trim the exposed parchment or not. I've done it both ways and prefer to not trim.Comment
-
Interesting question a coworker asked me about today. Thought I'd pose it to you. Does an aged starter taste better than a young starter? The older the better tasting? The older the starter the stronger?
(All else being equal, of course)
And if not, at what point is there parity between 2 starters? Like at 8 months, it's just as good as a 40 year starter?Comment
-
Remember... yeast is everywhere. It's in your kitchen. It's on your hands. It's invading your home from your backyard, your community. Those that sell 200 year old starters are shisters! Your local yeast invades your culture daily! Atmosphere dictates how your culture effects your bread. -
New yeast enters your sourdough culture daily. If your culture dies from abuse you can generate a new one in 2 weeks. The temperature of your culture dictates the taste of your bread. The activity of your starter dictates how long your dough will take to rise. Acidity content affects the flavor.
-
-
So I finally got to try out the new 5 qt. Lodge L8DD3 Cast Iron Double Dutch Oven (inverted with the skillet on bottom) and I've got to say it's pretty much perfect! Baked a loaf (seam side up) of Forkish White Bread with Poolish. The only really noticeable problem is that, while oven spring was pretty good, the loaf failed to split along the seam as it normally does. This is probably due to my decision to pick at a few sizable "subcutaneous" bubbles during the final shaping /tension pulling. I'm pretty sure that the loaf vented through those weak spots rather than through the seam. The crust was impeccably thin and crisp and the crumb was open, light, and moist. All in all, a pretty tasty success.
Next time, I'll bake the same bread in the new cloche for a comparison.
Comment
-
MBMorgan Just curious why you think failing to split is a failure? Your loaf looks great to me.Comment
-
A Tale of Two Breads:
For Christmas I asked for and was gifted "The New Artisan Bread in Five Minutes a Day". I made some bread from their master recipe, and I must say, I am impressed. So I wanted to do a comparison between the 5 minute bread and sourdough. Today I conducted the experiment. I started last night with a preferment of:
100 grams starter- 100% hydration 50/50 bread/WW flour
300 grams bread flour
200 grams water
I let that develop overnight for about 14 hours
Today I built it up to a 1 kilogram 66% hydration dough
Added 21 grams salt, and followed the Chef Jacob technique. While this was proofing I pulled out a 1.5 lb ball of the 5 minute dough. I shaped it into a batard, and let it rest per instructions on a prepared pizza peel.
I preheated the oven to 475 with my baking stone in the oven. The sourdough batard was slashed and put in the oven first. When the 5 minute batard was ready I slashed it, stuck it in the oven. For the steam I used a broiler pan and a cup of hot water per the 5 minute bread instructions.
The results:
Both breads were excellent! I like the sourdough better; my family apparently liked the 5 minute bread better, judging by how much was left. The 5 minute bread was sweeter, almost like a white sandwich bread. It had nice crust, but not quite like the sourdough. The sourdough had a more open crumb and crisper crust. Both loaves had excellent oven spring. I think they are both winners. It just depends on the kind of bread you want that day. 😎
The 5 minute bread is very easy to make, and you store the dough in the fridge for up to two weeks, so you can easily make bread any time. It won't replace my sourdough, but it is a fun and quick alternative when you want a fresh loaf for a meal.
In the picture of both, the one on the left is the 5 minute bread, the right is my sourdough.Attached FilesLast edited by Thunder77; January 6, 2017, 08:08 PM.Comment
-
-
Willy ... Ken Forkish developed the seam side up technique because he prefers high hydration sourdough bread. You can score the smooth side of 65% & 70% hydration dough and get a nice ovenspring and good ears on your loaves. That's not the case with 75% hydration bread. Your final proofed 75% hydration dough is very loose and is not easy to score. It acts more like Ciabatta dough does. He's counting on the seam to open up when the steam escapes the dough during the ovenspring process. The steam will always find the weakest part of the final proofed boule to escape. Sometimes you get surprised.😁Comment
-
Some of Forkish's breads proof in the fridge overnight and are then immediately baked. These are not as loose and the seam, for me, doesn't burst on its own all the time. I have no problem scoring these and baking seam side down. I like the Forkish's 78% Hydration breads. -
My last Forkish (FB#2) didn't explode open at the seam, but did crack there. It was a very sticky dough that would have been a nightmare to dock without a lame.
-
-
"artsy-fartsy" to an Artisan bread baker is important.
Using the recipe/formula that we do... we know we are going to get really great tasting loaves of sourdough bread.👍 That's a given.
So... the only real grading process has to be about how the crumb looks, light and airy? How the crust looks, blisters? No blisters? How was the ovenspring. Scoring... ears or no ears? Did you singe the edge of the ears without burning the crust? How does the bottom of your loaf look, color wise, relative to the crust? How crisp is your crust without burning your loaf? How thick is your crust?
The perfect loaf of sourdough bread 🥖 is elusive... I small failure in any step of the process can take a loaf from perfection to just really good. I get lots of really, really good looking loaves of sourdough bread but only a few every now and then that I will call the "Perfect Loaf". One must start every loaf with the Perfect Loaf as the goal. Every single step must be carefully executed and luck must be on your side.
Getting your first Perfect Loaf of sourdough bread... is an emotional experience!!! Spending the time to attain the knowledge to execute every step perfectly is an obsessive commitment that the average home bread baker will never make. Once you've acquired all of the necessary knowledge and honed your techniques and understand exactly why a loaf was not perfect can you stumble upon the Perfect Loaf.🙀
I honest to god think I cried... it's was one of those moments where you are alone and speechless, so you just cry.
That day for me was 3 loaves, all made on the same day and baked on my BGE, 1 right after the other, bingo, bango, bongo!!! I lined them up, took a picture and cried my eyes out. I had only been backing bread for about a year and I knew that these loaves were special.👌Attached FilesComment
-
-
Thunder77
Sorry... this is all I saw when I posted that.
"A Tale of Two Breads:
For Christmas I asked for and was gifted "The New Artisan Bread in Five Minutes a Day". I made some bread from their master recipe, and I must say, I am impressed. So I wanted to do a comparison between the 5 minute bread and sourdough. Today I conducted the experiment. I started last night with a preferment of:
100 grams starter- 100% hydration 50/50 bread/WW flour
300 grams bread flour
200 grams water
I let that develop overnight for about 14 hours"
The rest of the story was not yet there.Comment
-
Willy commented
January 6th, 2017, 09:30 PM
I'm thinking I want to get started doing, at least trying, higher hydration loaves--looser crumb, right? I really do like the appearance of a docked loaf, though. I've been reading Forkish (FWSY) and enjoy his thoughts.
Ken Forkish is a wizard of high hydration sourdough bread. I think the best of the best. I would strongly suggest you buy his book if you want to move into high hydration sourdough bread.
Truth be known... making 75% hydration sourdough bread is easier than 65% hydration dough. It's easier to learn bread baking starting with 65% hydration though. Final shaping and scoring is much easier with lower hydration dough.
Knowing how to do both will make you a better bread baker, for sure.👍
Yes... higher hydration gives you a softer, lighter crumb.Comment
-
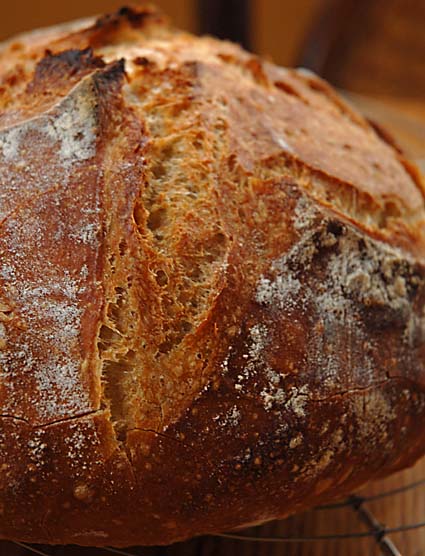
Another 78% hydration loaf of Forkish's Field Blend #2 baked this AM. As you can see, it was most definitely scored with a lame, and quite successfully too.
Comment
-
Another refrigerator proofed Forkish 78% hydration loaf from Christmas. Already sliced, so you get a look at the crumb, but this was scored as above. Bottom line is I have no problem scoring refrigerator proofed high hydration breads, and have made it a practice that works.
Comment


Comment