My gear:
22 Weber Kettle
Napoleon PRO Charcoal Kettle Grill
Broil King Keg
Traeger Pro 34
Napoleon Prestige Pro 500
Pit Barrel Cooker
Blackstone Range Combo Griddle
I ordered one of these last year and forgot all about it until I received my FireBoard 2 Drive this week. I read somewhere that this was the right adaptor for the PBC and was wondering if any of you PBC owners have installed one of these, and if so, how you went about it. https://www.bbqguru.com/storenav?Cat...2&ProductId=17
Thanks for any tips.
Last edited by pkadare; June 13, 2020, 02:36 AM.
Reason: Forgot the link.
My gear:
22 Weber Kettle
Napoleon PRO Charcoal Kettle Grill
Broil King Keg
Traeger Pro 34
Napoleon Prestige Pro 500
Pit Barrel Cooker
Blackstone Range Combo Griddle
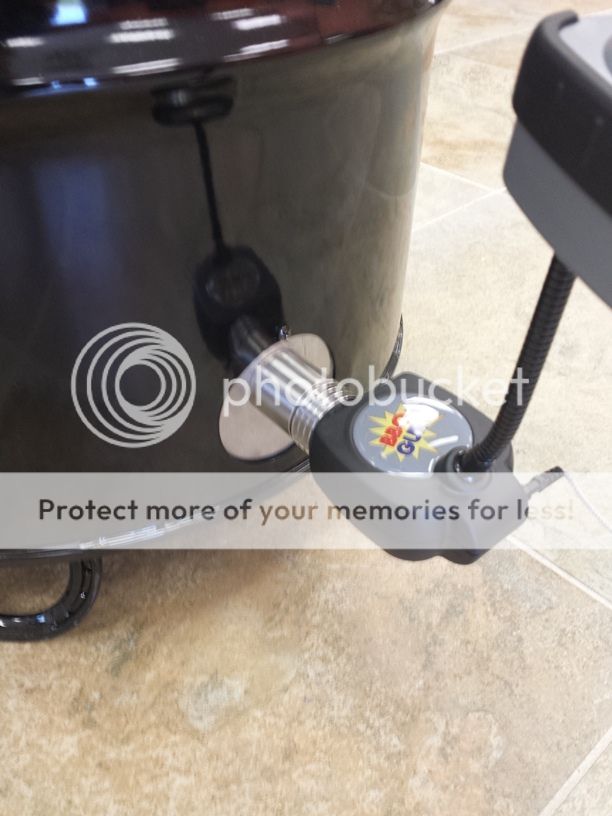
Never mind, found a picture that answers my question. To be honest, I didn't even think of mounting it from the inside like this and couldn't figure out how I could relatively easily swap between the adaptor and the normal baffle if needed.
Glad you found that picture - I was picturing it mounting from the outside, but doing it the way you show it would make it easier to draw it down with a screw and force it to curve to fit the inside of the barrel.
The other nice thing is you ought to be able to pull the fan off and install the kill plug, and plug the rebar holes, and snuff the fire pretty quickly, if you have a shorter cook and want to kill the fire and save charcoal.
When I ordered a DigiQ setup a couple of years ago, I selected the Weber adapter: https://www.bbqguru.com/storenav?Cat...=2&ProductId=6 Since then, I've switched to a Fireboard controller and fan with the original adapter. It's worked fine.
This adapter required me to drill a new hole in the PBC with a step drill bit. The original vent opening has been covered with tape that can handle heat. In case of a controller failure, I can cap the Weber adapter and go back to the standard vent.
I'm glad I switched from the DigiQ to the Fireboard. I really like the functionality compared to the DigiQ. The Fireboard 2 looks really nice, but I don't see any features that would justify the $$$ to upgrade.
I'm liking the new Fireboard. Of course, I don't have the old one to compare it to.
Having used it twice now, 30 hrs of use time took the battery to 50%.
Im sure that will go down faster once I hook a fan to it.
My toys:
Weber Summit Charcoal Grilling Center (WSCGC) aka Mr. Fancypants
Pit Barrel Cooker (which rocks), named Pretty Baby
Weber Summit S650 Gas Grill, named Hot 'n Fast (used mostly for searing and griddling)
Weber Kettle Premium 22" named Kettle Kid, eager to horn in with more cooks in the future
Camp Chef Somerset IV 4-burner outdoor gas range named AfterBurner due to its 30kBTU burners
Adrenaline BBQ Company Gear:
SnS Low Profile, DnG, and Large Charcoal Basket, for WSCGC
SnS Deluxe for 22" Kettle
Elevated SS Rack for WSCGC
SS Rack for DnG
Cast Iron Griddle
Grill Grate for SnS
Grill Grates: five 17.375 sections (retired to storage)
Grill Grates: six 19.25 panels for exact fit for Summit S650
gasser
Grill Grates for 22" Kettle
2 Grill Grate Griddles
Steelmade Griddle for Summit gas grill
Fireboard Gear:
Extreme BBQ Thermometer Package
Additional control unit
Additional probes: Competition Probes 1" (3) and 4" (1), 3 additional Ambient Probes. 1 additional Food Probe
2 Driver Cables
Pit Viper Fan (to pair with Fireboard Fan Driver Cable)
Pit Viper Fan new design (to pair with Fireboard Fan Driver Cable)
Thermoworks Gear:
Thermapen MK4 (pink)
Thermapen Classic (pink too)
Thermoworks MK4 orange
Temp Test 2 Smart Thermometer
Extra Big and Loud Timer
Timestick Trio
Maverick ET 73 a little workhorse with limited range
Maverick ET 733
Maverick (Ivation) ET 732
Grill Pinz
Vortex (two of them)
18" drip pan for WSCGC
Ceramic Spacers for WSCGC in Kamado Mode: 2 sets each 1/2", 1", 2". The 2" spacers work best with the 18" drip pan. The 1+1/2 inch spacers work best with the 14 inch cake pan.
Two Joule Sous Vide devices
3 Lipavi Sous Vide Tubs with Lids: 12, 18 and 26 quarts
Avid Armor Ultra Pro V32 Chamber Sealer
Instant Pot 6 Quart Electric Pressure Cooker
Instant Pot 10 Quart Electric Pressure Cooker
Charcoal Companion TurboQue
A-Maze-N tube 12 inch tube smoker accessory for use with pellets
BBQ Dragon and Dragon Chimney
Shun Classic Series:
8" Chef Knife
6" Chef's Knife
Gokujo Boning and Fillet Knife
3 1/2 inch Paring Knife
I've seen that XL Dome Adapter installed both on the inside and the outside of the PBC.
I like the inside installation with only the one little bolt that holds the original vent cap. That way it's easy to go back and forth--run the PBC old school or slap the adapter on and run it with a fan. Just be sure you shape the adapter to a slight curve and slide it into the barrel seam.
I've been playing with it some with my Pit Viper and Fireboard. The key is to let it kick in before the fire gets too hot. So I modified my lighting method to 10-10 (or 15-10 for Kingsford Professional) and let the fan do the work of keeping the fire well lit. I've only used it for a couple of high temp poultry cooks.
The PBC, if well lit, can rock a temperature pretty solidly for hours, so a fan and controller are not strictly necessary. But the new setup is fun to play with.
P.S. BBQ Guru will send you installation instructions specific to the PBC. I followed their method. It might be on their site as well.
The numbers refer to how long to let the charcoal burn for each step in lighting.
In this case 10 minutes in the chimney, followed by dumping the chimney onto your unlit charcoal and leaving the lid off the PBC for 10 more minutes.
15-10 would be to let the chimney burn for 15 minutes before dumping.
Question: are folks buying the Fireboard for temp control and the bbq guru fan as the blower? Why not get the BBQ Guru kit? I don’t want to have to drill into the PBC.
BBQ Guru Pit Viper plugged into fireboard v1. I just found the drill bit that matched the stock damper’s hole. Then I poked a screwdriver through the bolt hole in the PBC with the adapter in place. The screwdriver scored a mark to drill the hole. Drilled it and with a little bending I used the stock bolt and nut to affix the dome adapter in place with no gaps. I might put felt gasket around the perimeter of the dome adapter in the future if I think it needs to be completely airtight.
Attached Files
Last edited by jhapka; September 29, 2020, 07:16 AM.
jpsep I chose the Fireboard because of the app. I’m not sure if the DigiQ or any other fan controller is better in terms of temp control. I live 5 minutes from work so I can cook and monitor temps through the app from my office. I also like that it archives cooks and you can add notes and pictures.
I mounted mine from the outside. Found it easier than getting everything lined up from the inside.
Drilling 4 holes for bolts is pretty quick.
I also used a high temp sealer. It's adhesive enough you could probably get away without drilling the holes.
Last edited by BFlynn; September 28, 2020, 07:34 PM.
XL dome adapter from bbq guru, if you buy the "Fireboard 2 Drive" model you don’t need the fan cable but if you buy a standard Fireboard 2 then also get the fan cable.


Comment